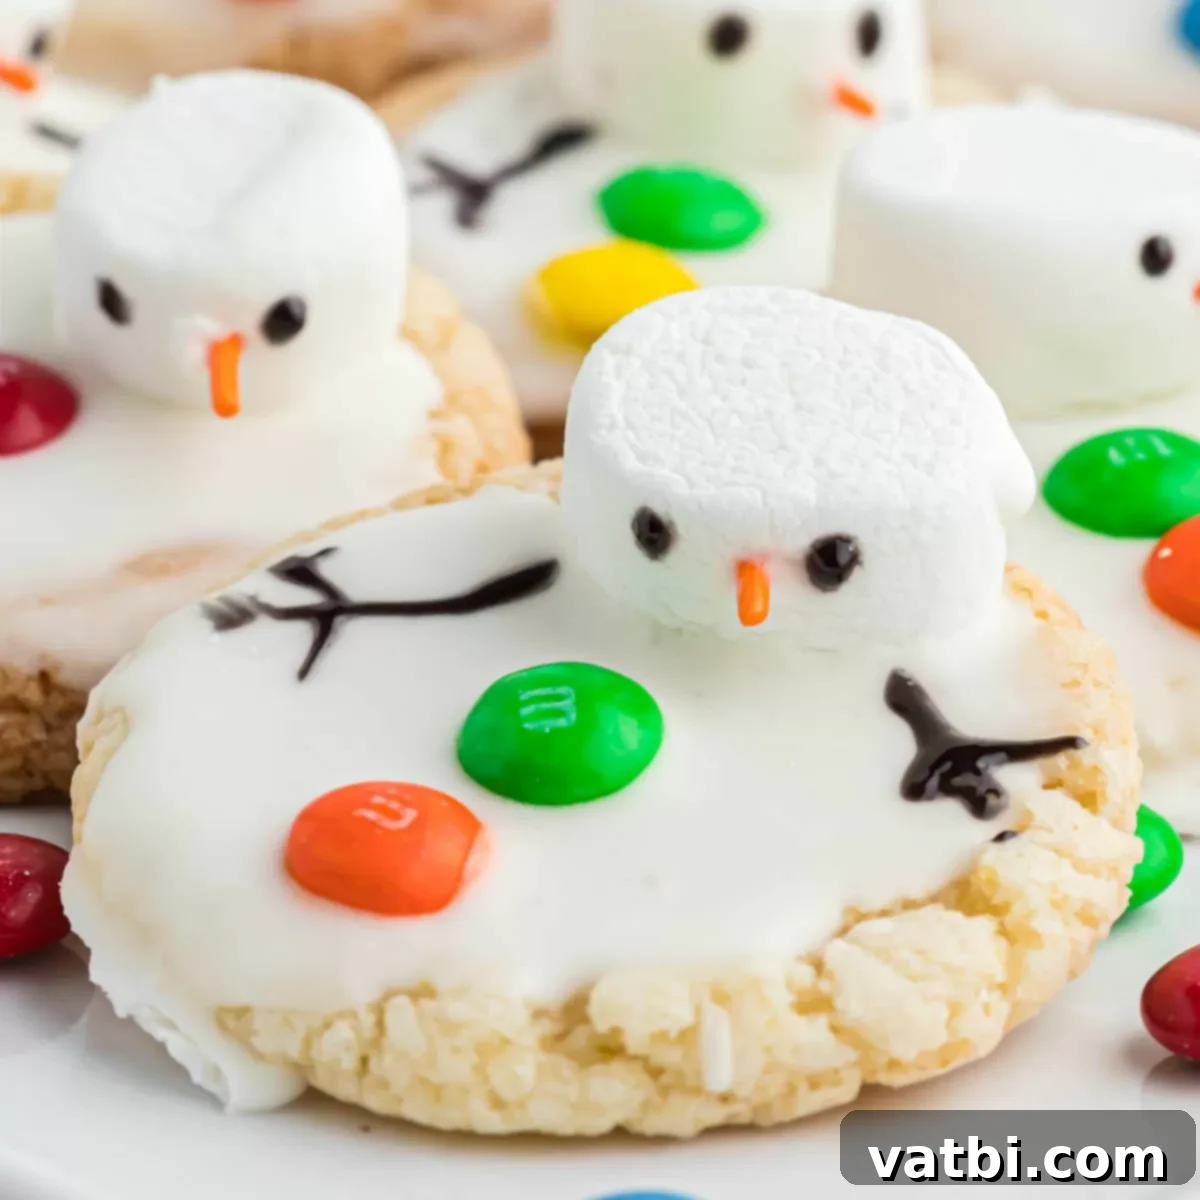
Whimsical Melted Snowman Cookies: Your Ultimate Guide to a Fun & Easy Winter Treat
Get ready to sprinkle some magic into your holiday baking with these utterly charming Melted Snowman Cookies! This recipe isn’t just about baking; it’s an invitation to create whimsical, edible art that brings smiles to everyone’s faces. Imagine soft, delicious sugar cookies transformed into adorable, playful melted snowmen with just a few simple decorations. These festive treats are guaranteed to be the star of any winter gathering, a hit at holiday parties, or simply a delightful snack for a cozy night in, perfect for kids and adults alike.
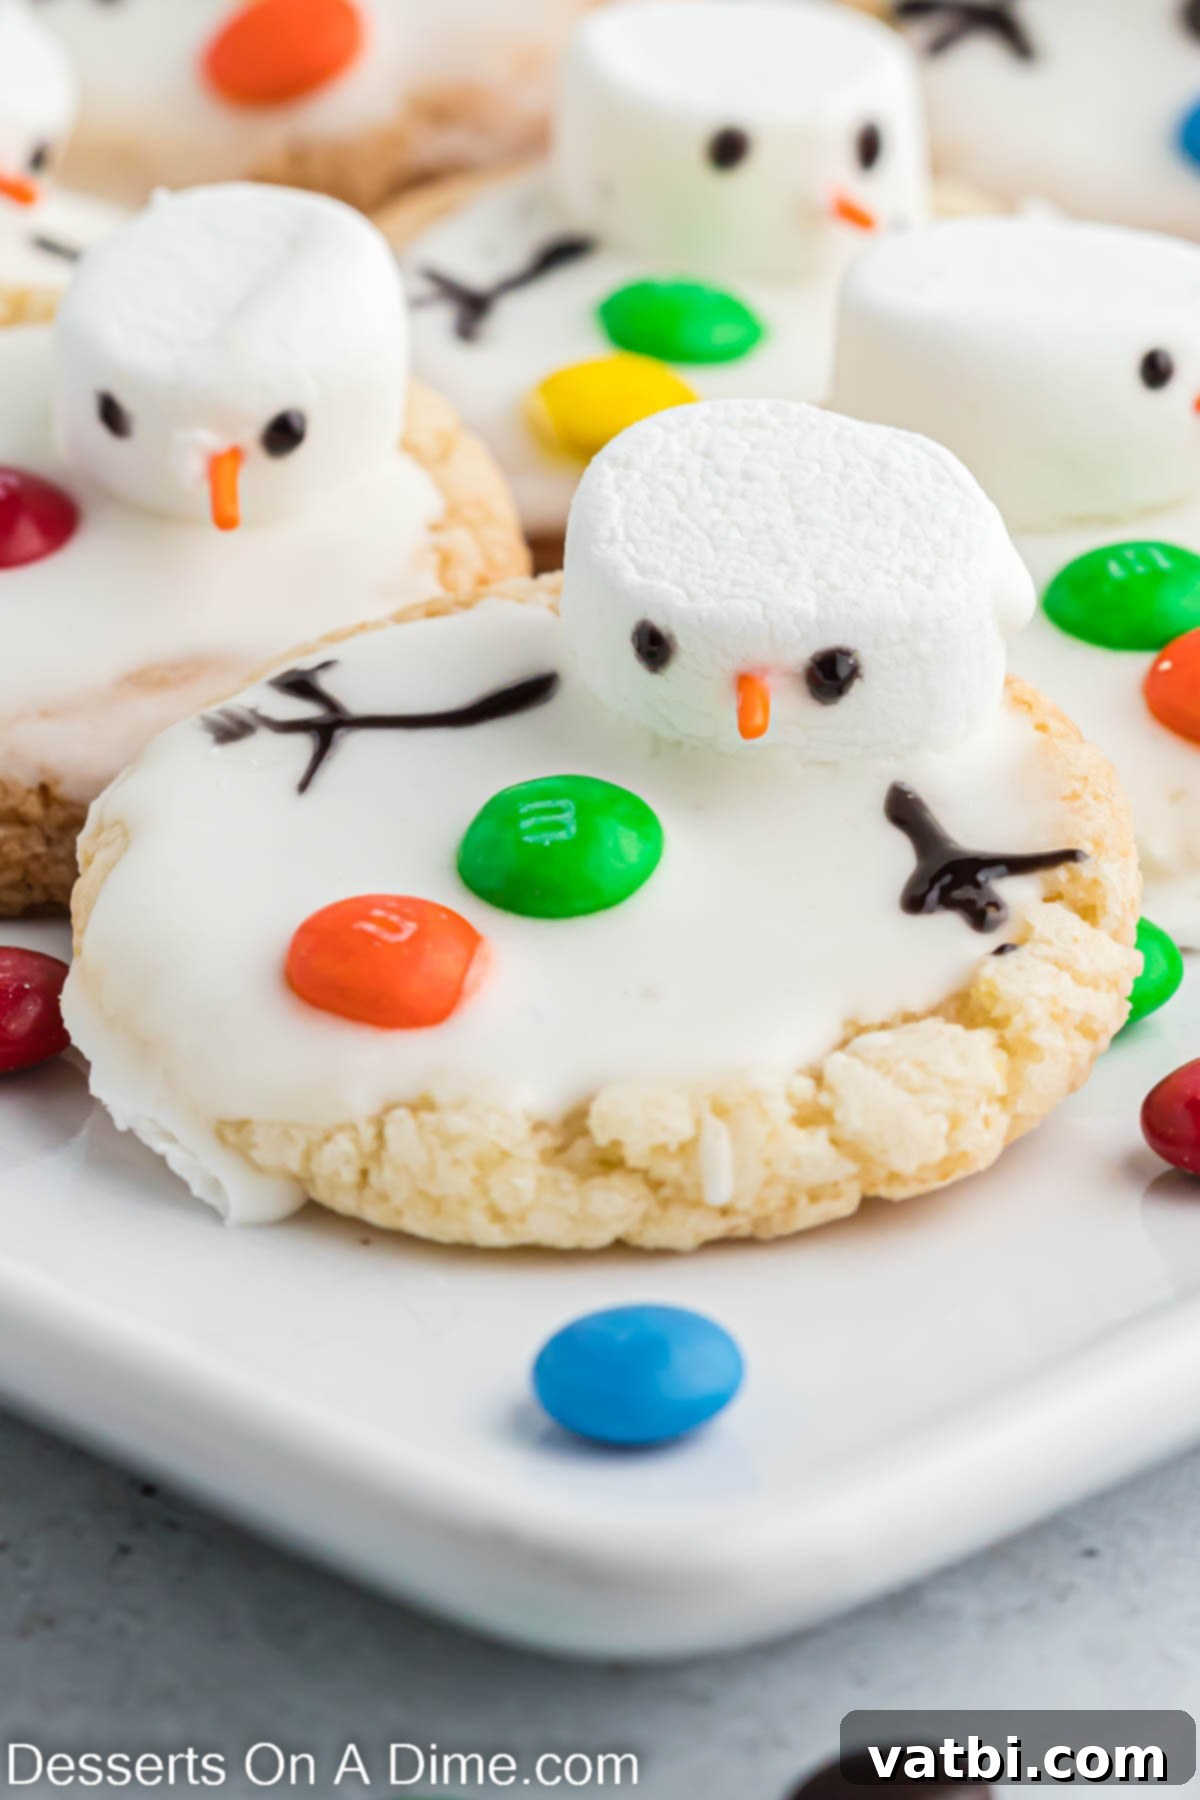
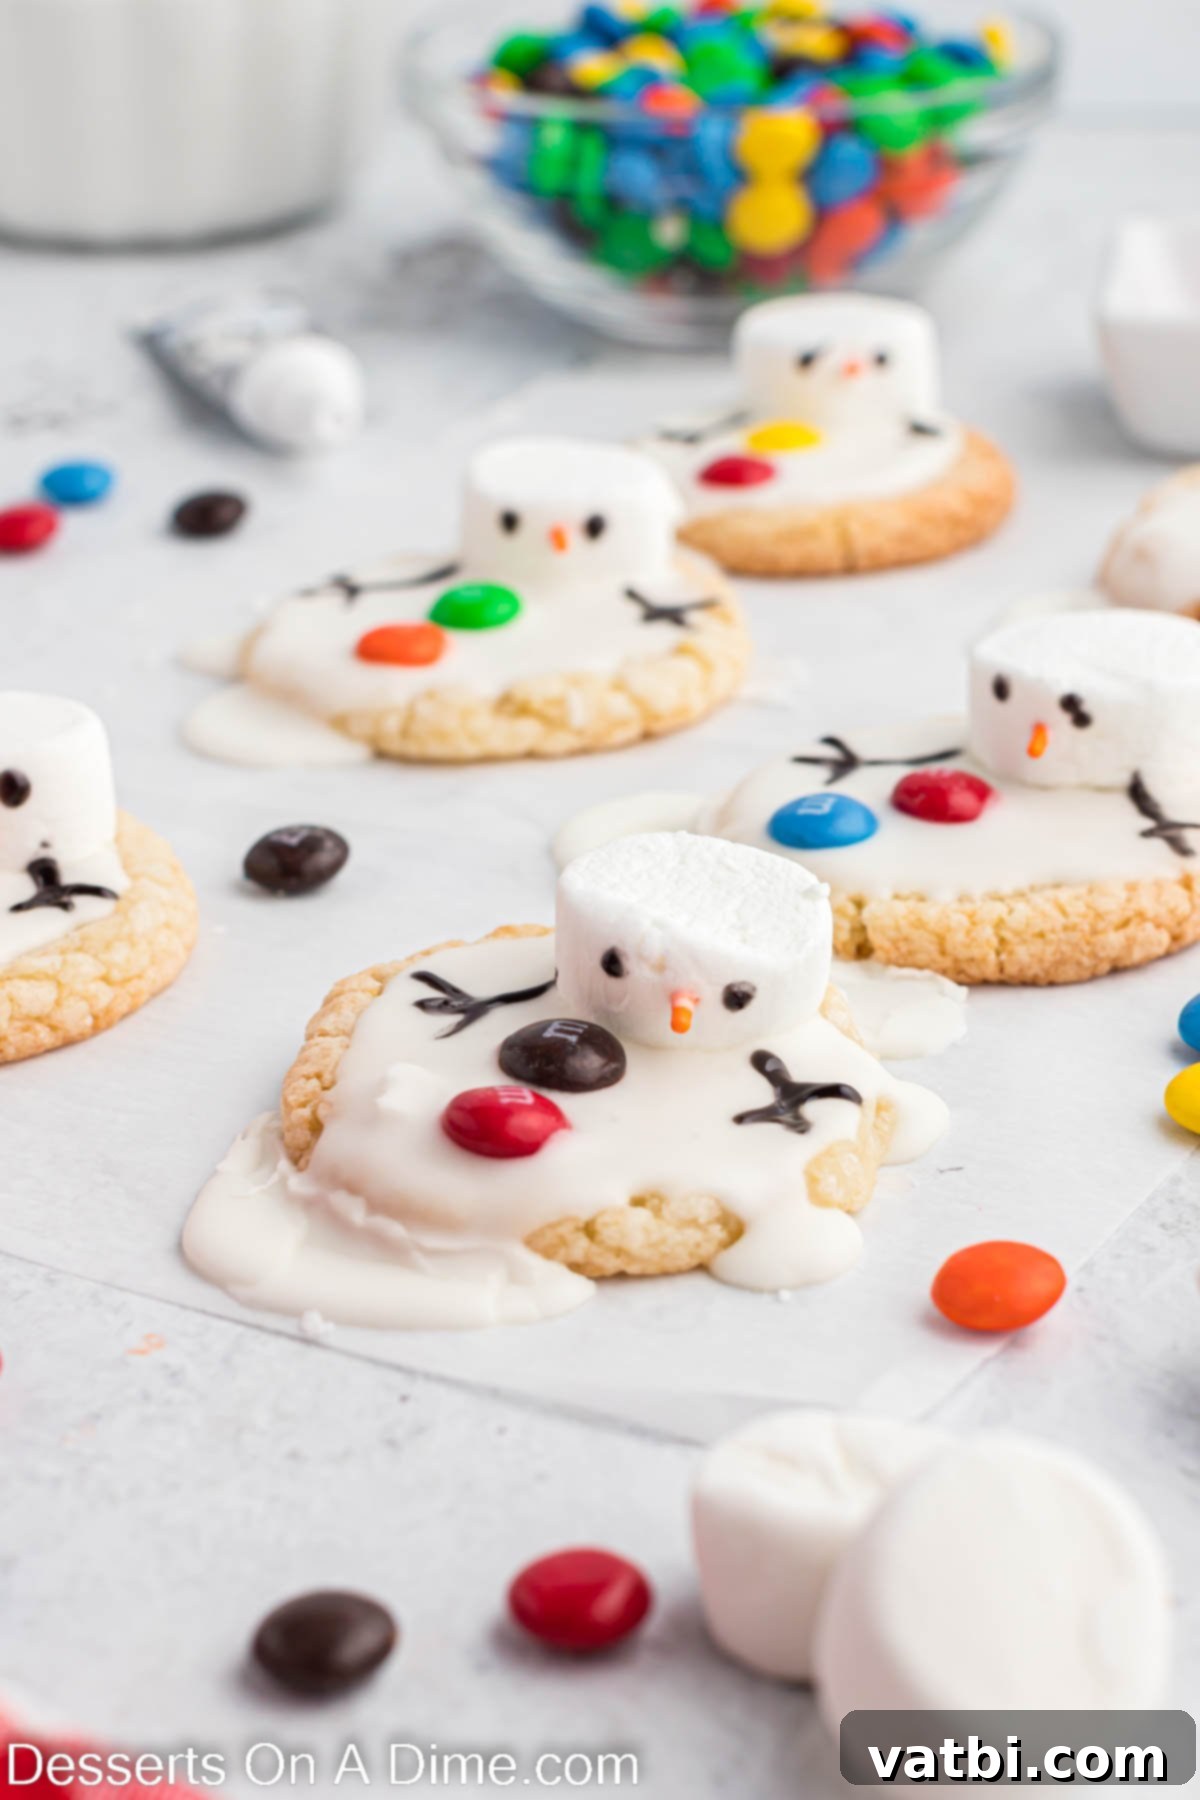
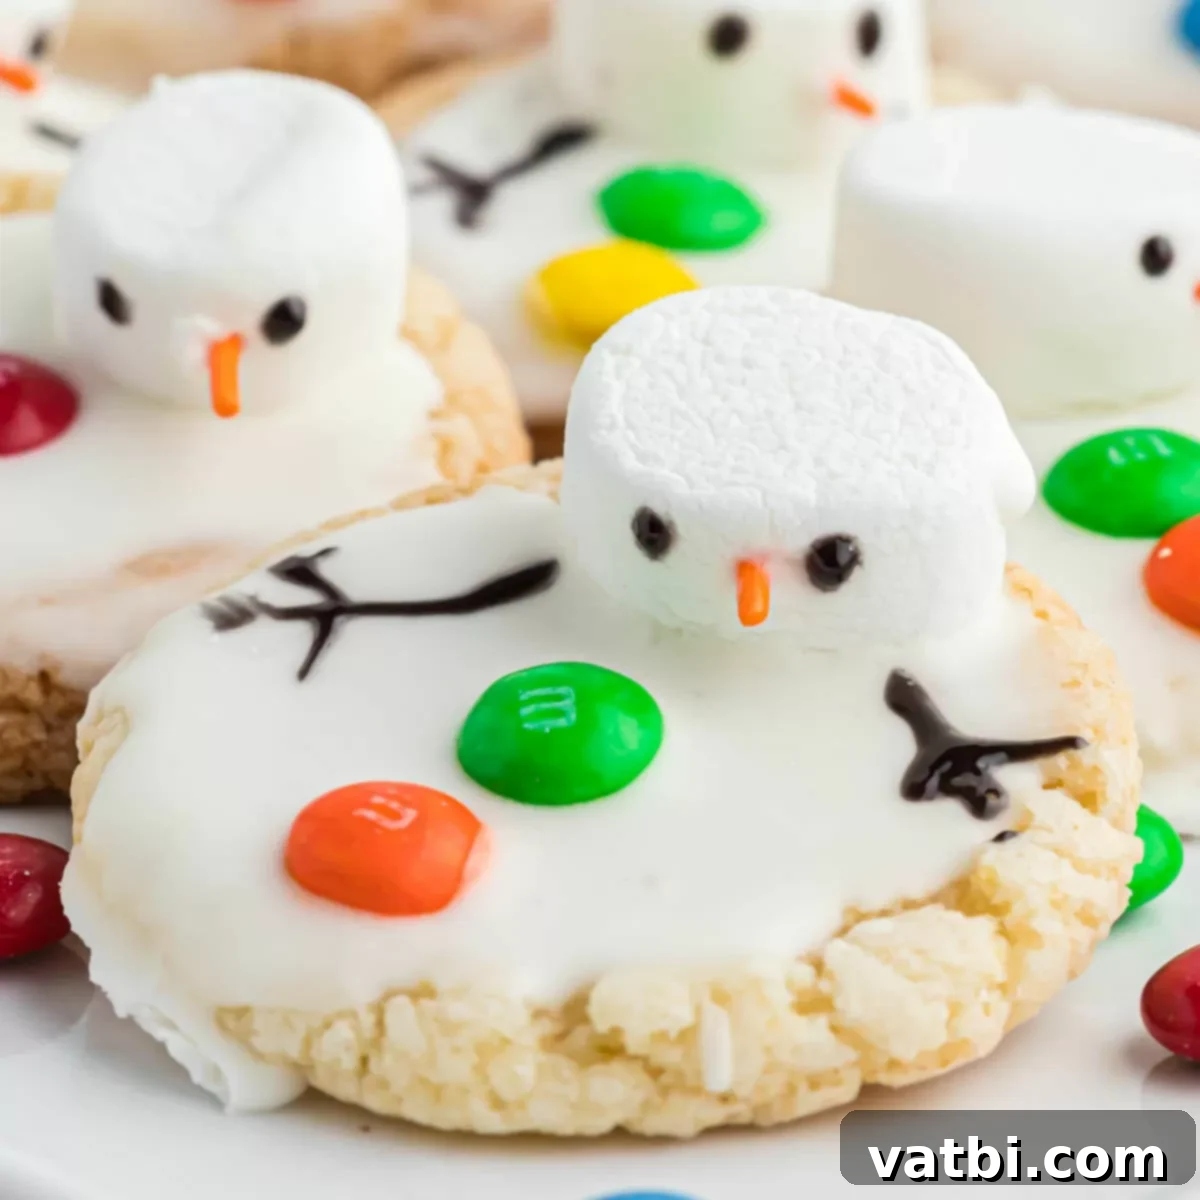
What makes these Melted Snowman Cookies truly special is their delightful combination of comforting taste and irresistible visual appeal. Each perfectly baked, tender sugar cookie base provides a sweet foundation for the imaginative decorations. The “melted” effect, achieved with smooth, white royal icing, sets the scene for a comical marshmallow snowman head, adorned with vibrant candy buttons and a playful piped face. It’s a dessert that looks intricate and professional but is surprisingly straightforward to master, making it an excellent choice for bakers of all skill levels, even those new to the art of cookie decorating.
For added convenience and ease, we’ve designed this recipe to be incredibly accessible. You can effortlessly whip up these delightful winter cookies using a readily available store-bought sugar cookie mix. This strategic shortcut significantly cuts down on prep time, allowing you to spend less time on complex baking steps and more time enjoying the creative process of decorating, as well as the joyous reactions of those who get to savor these festive sweets. Whether you’re preparing a charming dessert for a holiday potluck, a school event, or simply want to brighten a dreary winter day at home, this easy and fun recipe is unequivocally perfect.
Children, especially, will absolutely adore these darling little snowmen. The playful concept sparks imagination and makes eating them an adventure. Beyond just being delicious, these cookies offer a wonderful opportunity for a fun and engaging family baking project. Gather your loved ones, put on some festive holiday music, and let the decorating begin! These charming cookies are more than just a sweet treat; they’re a delightful experience waiting to happen, easily becoming a cherished part of your winter traditions. They are, without a doubt, among the best and most beloved winter cookies you can make.
These Melted Snowman Cookies are an excellent choice for a snowman-themed party or a winter wonderland celebration. They perfectly complement other festive treats and add a unique, charming twist to any dessert spread. Consider pairing them with Snowman Oreo Balls, Melted Snowman Bark, Snowman Chocolate Covered Oreos, and traditional Snowman Sugar Cookies for a truly magical winter dessert table.
Table of Contents
- Why These Melted Snowman Cookies Are a Must-Try
- Essential Ingredients for Your Snowman Cookies
- For the Sugar Cookie Base
- For the Perfect Royal Icing
- Creative Variations to Customize Your Snowmen
- Step-by-Step Guide to Making Melted Snowman Cookies
- Storage Tips for Freshness
- Frequently Asked Questions About Snowman Cookies
- Expert Pro Tips for Perfect Melted Snowman Cookies
- More Decorated Cookie Recipes to Explore
Why These Melted Snowman Cookies Are a Must-Try
There are countless reasons why these delightful melted snowman cookies quickly become a favorite in any household, year after year. Beyond their irresistibly cute and whimsical appearance, their comforting taste and the sheer joy they bring to the baking process are unparalleled. These cookies are a celebration of the winter season, embodying its playful spirit in every bite. They are perfectly suited for a wide array of occasions, from elegant holiday dinner parties and festive gatherings to casual family movie nights, and they never fail to elicit smiles and compliments.
One of the primary appeals of this recipe is its perfect alignment with the cozy ambiance of winter. The humorous imagery of “melted” snowmen evokes a sense of lighthearted fun and warmth, making these cookies an ideal treat to enjoy during chilly evenings. Imagine snuggling up with a warm beverage, perhaps a rich hot chocolate or a spiced cider, and savoring one of these adorable cookies while watching classic winter movies like “Frosty the Snowman,” “The Snowman,” or “Elf.” They effortlessly elevate a simple family movie night into a memorable, festive event, adding a touch of magic and tradition to your seasonal celebrations.
Furthermore, their remarkable ease of preparation makes them accessible to everyone, regardless of their baking experience. Whether you’re an experienced home baker or just starting out with cookie decorating, the straightforward steps ensure a successful and enjoyable experience. The option to use a high-quality store-bought sugar cookie mix is a significant advantage, saving precious time and effort without compromising on the delicious flavor or tender texture of the cookie base. This convenience allows you to focus more on the most exciting part: decorating! Kids and adults alike will relish the creative freedom that comes with bringing each snowman to life, designing unique facial expressions and colorful buttons with candies and icing, fostering wonderful memories and family bonding.
These versatile snowman sugar cookies are not only delicious but also incredibly practical for various purposes. They make fantastic edible gifts for teachers, neighbors, friends, and co-workers. Pack them beautifully in festive boxes or clear bags tied with ribbons, and you have a thoughtful, homemade present that is sure to be appreciated and remembered. For school holiday events, office parties, or community bake sales, their unique charm and appealing story make them stand out from typical desserts, guaranteeing they’ll be a popular choice. They’re a delightful conversation starter, a guaranteed mood lifter, and a truly special way to share holiday cheer. Don’t hesitate to save this reliable recipe; it’s destined to become a beloved staple in your winter and Christmas recipe collection for years to come.
Essential Ingredients for Your Snowman Cookies
Crafting these adorable melted snowman sugar cookies requires a thoughtful combination of simple, readily available ingredients. Many of these items are likely already in your pantry or can be easily found at any local grocery store. The beauty of this recipe lies in its flexibility, offering options for both homemade purists and those who appreciate the convenience of store-bought components, all while ensuring a delicious outcome. Here’s a detailed look at what you’ll need to create your festive cookie masterpieces:
For the Sugar Cookie Base
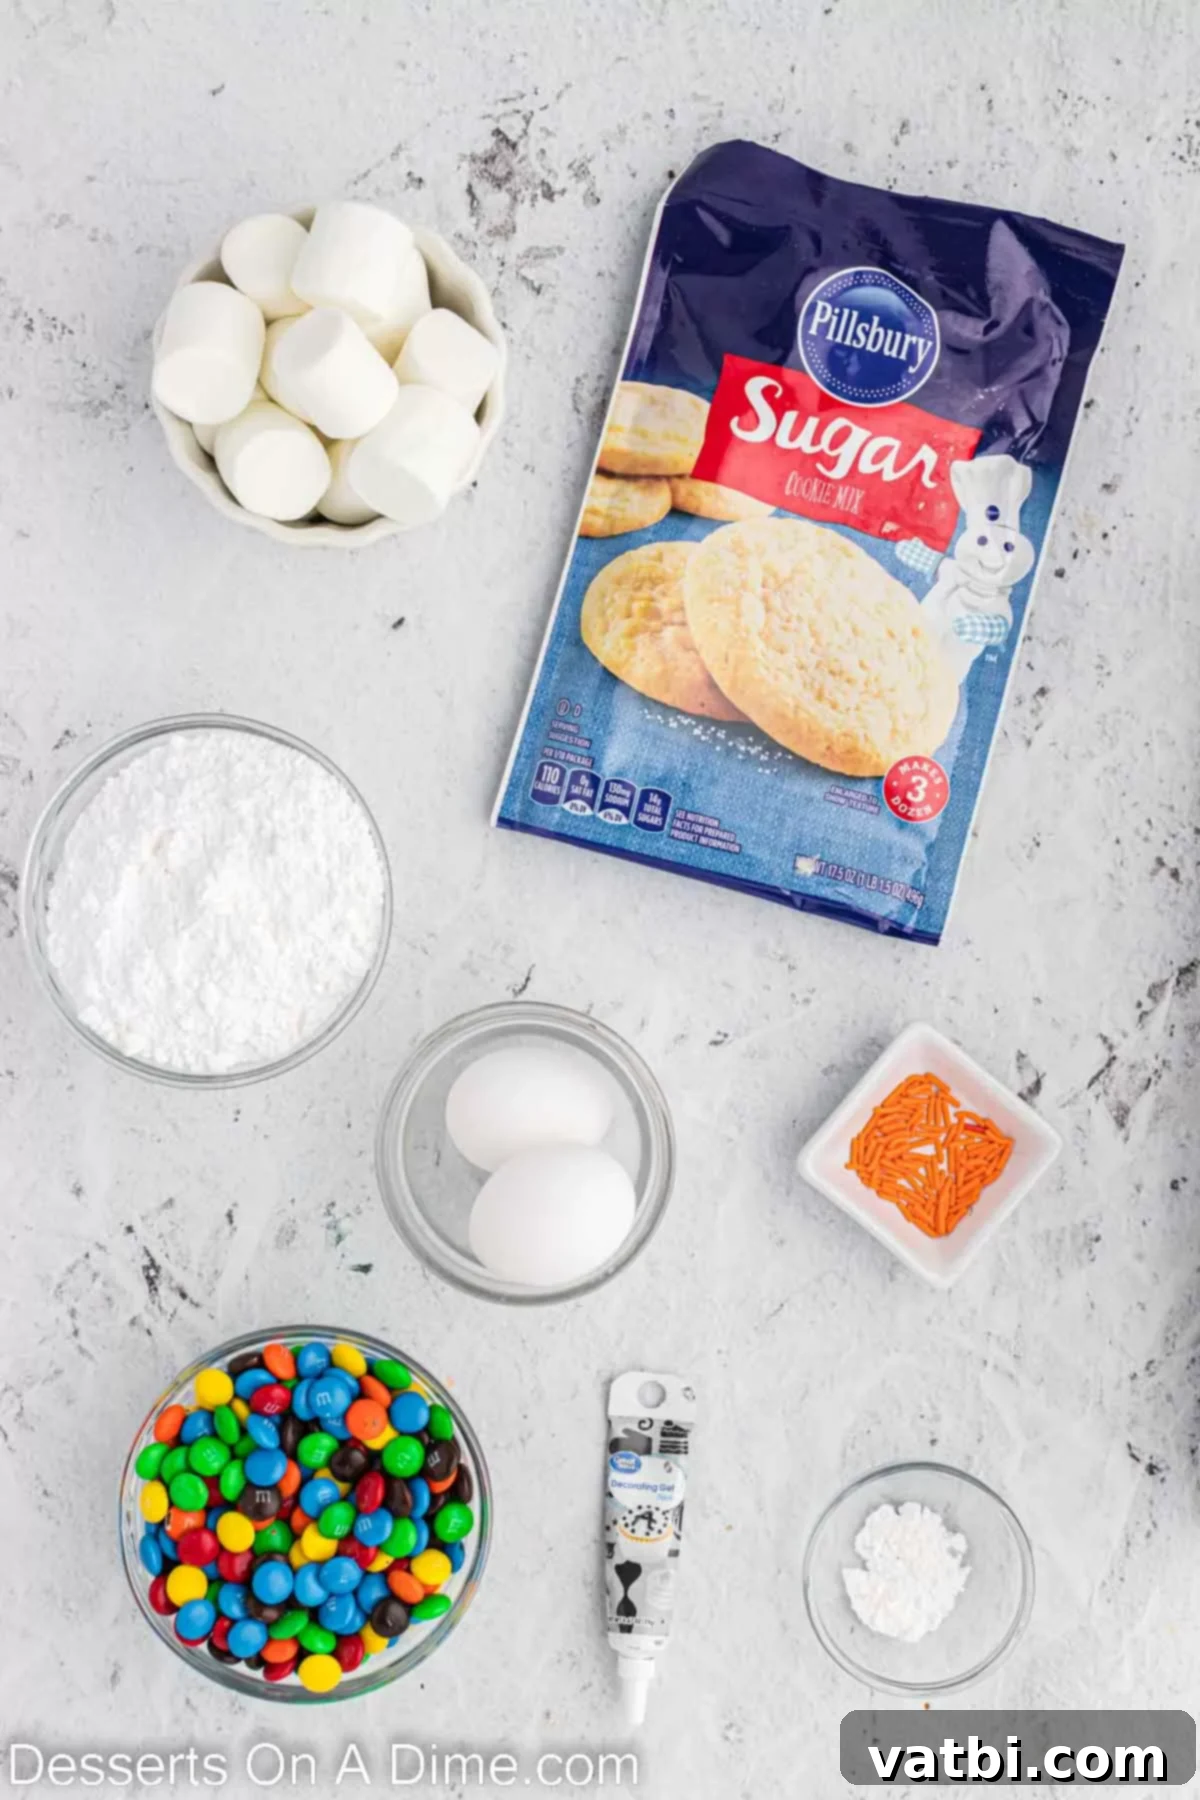
- Sugar Cookie Mix: This ingredient is your secret weapon for quick and stress-free baking. Any reputable brand, such as Pillsbury, Betty Crocker, or Duncan Hines, will work perfectly. Be sure to have all the additional wet ingredients required by the package instructions on hand; these typically include butter, eggs, and a small amount of water or milk. Utilizing a mix not only drastically cuts down on preparation time but also consistently delivers delicious, perfectly textured cookies every time, minimizing baking guesswork.
- Large Marshmallows: These are absolutely crucial for forming the snowman’s iconic “head.” The key is to cut each large marshmallow in half horizontally. This step is essential as it provides a flatter, more stable base for the marshmallow to adhere to the cookie and creates the ideal proportion for a charming “melted” snowman effect.
- Sprinkles: Long, thin orange sprinkles are specifically recommended for crafting the snowman’s adorable carrot nose. Their elongated shape perfectly mimics a miniature carrot, adding a classic and instantly recognizable touch to your design. While orange is traditional, feel free to experiment with other colors if you’re feeling particularly creative, though orange offers the most authentic look.
- M&Ms: Regular, plain M&Ms work wonderfully for the snowman’s colorful buttons. Their consistent round shape and wide array of vibrant colors make them an easy and visually appealing choice. You can either sort through them to select specific colors for a coordinated look or use a random mix for a more playful, varied appearance on each cookie.
- Black Decorating Gel: This specialized gel is invaluable for its precision and ease of use when piping the delicate details of the snowman’s eyes, mouth, and stick arms. Its fine tip allows for intricate lines and expressive details, ensuring those adorable facial expressions and twig-like arms come out just right, bringing your melted snowmen to life.
For the Perfect Royal Icing
Royal icing is an essential component for these cookies, as it provides that smooth, elegant, and quick-drying finish for your melted snow base. It dries hard and crisp, which is fundamental for stacking, storing, and transporting your decorated cookies without fear of smudging or damage.
- Egg Whites: These form the structural backbone of royal icing, providing both stability and a beautiful glossy sheen. While fresh egg whites can be used, pasteurized liquid egg whites, conveniently found in cartons in the refrigerated section of most grocery stores, offer a safe and time-saving alternative, especially for those concerned about consuming raw eggs.
- Powdered Sugar (Confectioners’ Sugar): This fine sugar is what gives the icing its characteristic sweetness, body, and smooth texture. I highly recommend sifting the powdered sugar thoroughly before mixing. This crucial step removes any pesky lumps, ensuring your royal icing is perfectly smooth and free of gritty bits, which is vital for achieving a flawless, professional-looking finish on your cookies.
- Cream of Tartar: This ingredient is absolutely critical and should not be omitted! Cream of tartar acts as a crucial stabilizing agent for the egg whites. It significantly aids in helping the egg whites whip up to a greater volume, creates a more stable meringue, and gives the royal icing its characteristic crisp, quick-drying, and firm texture. It’s the ingredient that ensures the icing hardens sufficiently to protect your delicate decorations and allows for easy handling and stacking of the finished cookies.
For the precise measurements and quantities of each ingredient, please refer to the comprehensive recipe card located at the very bottom of this page.
Creative Variations to Customize Your Snowmen
One of the most enjoyable aspects of making Melted Snowman Cookies is the endless possibilities for personalization and creative customization. While the classic design is undeniably charming and universally loved, don’t hesitate to experiment with different ingredients, flavors, and decorative elements to infuse these cookies with your unique touch. Here are some fantastic variations and ideas to spark your culinary creativity and make your snowmen truly stand out:
- Sugar Cookie Base Alternatives:
- Homemade Sugar Cookies: If you prefer the satisfaction of baking from scratch, feel free to substitute the mix with your favorite homemade sugar cookie recipe. Our popular 3-Ingredient Sugar Cookie Recipe offers a delicious and quick homemade option. Just ensure your chosen recipe yields cookies that are relatively round and provide a stable, flat base for decoration.
- Different Flavored Cookies: For a delightful flavor twist, consider using a gingerbread cookie base. Its warm, spicy notes are absolutely perfect for the winter season and pair wonderfully with the sweet icing. Alternatively, a subtle lemon sugar cookie, snickerdoodles, or even rich chocolate cookies could offer a unique foundation, giving your “melted creatures” a different character.
- Store-Bought Pre-Baked Cookies: For the ultimate in convenience, you can even purchase plain, round sugar cookies from a local bakery or the grocery store. This allows you to bypass the baking step entirely and jump straight into the fun and creative decorating process, perfect for busy schedules.
- M&M’s and Candy Buttons Exploration:
- Seasonal M&M’s: Leverage the wide variety of holiday-themed M&M’s available throughout the year. Use festive red and green for Christmas, pastel colors for a general winter theme, or even darker shades for a sophisticated look.
- Reese’s Pieces: These iconic peanut butter candies offer a delicious flavor alternative to chocolate and introduce a different, warm color palette for snowman buttons.
- Mini Chocolate Chips: For a more classic, understated look, mini chocolate chips can be used effectively as buttons or even for creating charming, smaller eyes.
- Small Gummy Candies or Candied Fruit Pieces: Tiny, round gummy candies or small, diced pieces of candied fruit can add a chewy texture and bright pops of color to your snowman’s belly.
- Royal Icing Flavors and Colors Enhancement:
- Flavor Extracts: Elevate the taste of your royal icing by incorporating various extracts. A few drops of lemon extract can add a zesty brightness, peppermint extract provides a refreshing wintery touch, and almond extract offers a delicate, nutty note. When aiming for pristine white icing, remember that clear vanilla extract is essential, as traditional vanilla extract can impart a slight brown tint.
- Food Coloring: While pure white icing beautifully simulates melted snow, you could lightly tint a small portion of your icing a very pale blue for an “icy” effect, or a subtle light gray for a nuanced shadow around the snowman, adding depth to the design.
- Creative Decorations for Snowmen Accessories:
- Charming Scarves: Create adorable scarves for your snowmen using thin strips of fruit leather (such as Fruit Roll-Ups) or pull-and-peel Twizzlers. Gently drape and shape a strip around the base of the marshmallow head.
- Miniature Hats: Small chocolate-covered cookies (like mini Oreos) or even a halved mini marshmallow placed on top of the snowman’s head can serve as a cute hat. You can then decorate these “hats” with a tiny dot of icing or sprinkles.
- Alternative Buttons: Beyond M&M’s, consider using small round sprinkles, tiny edible sugar pearls, or even miniature colored candies for varied and interesting buttons.
- Realistic Arms: Instead of piping black gel, thin pretzel sticks can be used for wonderfully realistic “twig” arms. Simply press them gently into the still-wet royal icing. Alternatively, small pieces of black licorice laces can also mimic twig arms effectively.
- Rosy Cheeks: A tiny dab of pink edible glitter, a touch of pink food coloring applied with a clean, fine paintbrush, or even a very small red sprinkle can give your snowmen charming rosy cheeks.
- Sparkling Touch: For an extra festive and glamorous look, lightly dust the still-wet royal icing with edible glitter or sparkling sugar, making your snowmen shimmer like fresh snow.
Do not be afraid to let your imagination run wild! The more unique and varied your melted snowman cookies are, the more personality and charm they will possess. This recipe is designed to be a delightful canvas for your winter and holiday creative expression, encouraging you to personalize each sweet creation.
Step-by-Step Guide to Making Melted Snowman Cookies
Making these adorable and whimsical Melted Snowman Cookies is a fun and incredibly rewarding process that comes together easily with a little attention to detail. Follow these comprehensive, step-by-step instructions to ensure your cookies turn out perfectly charming, visually appealing, and utterly delicious:
Step 1: Prepare and Bake Your Sugar Cookies to Perfection
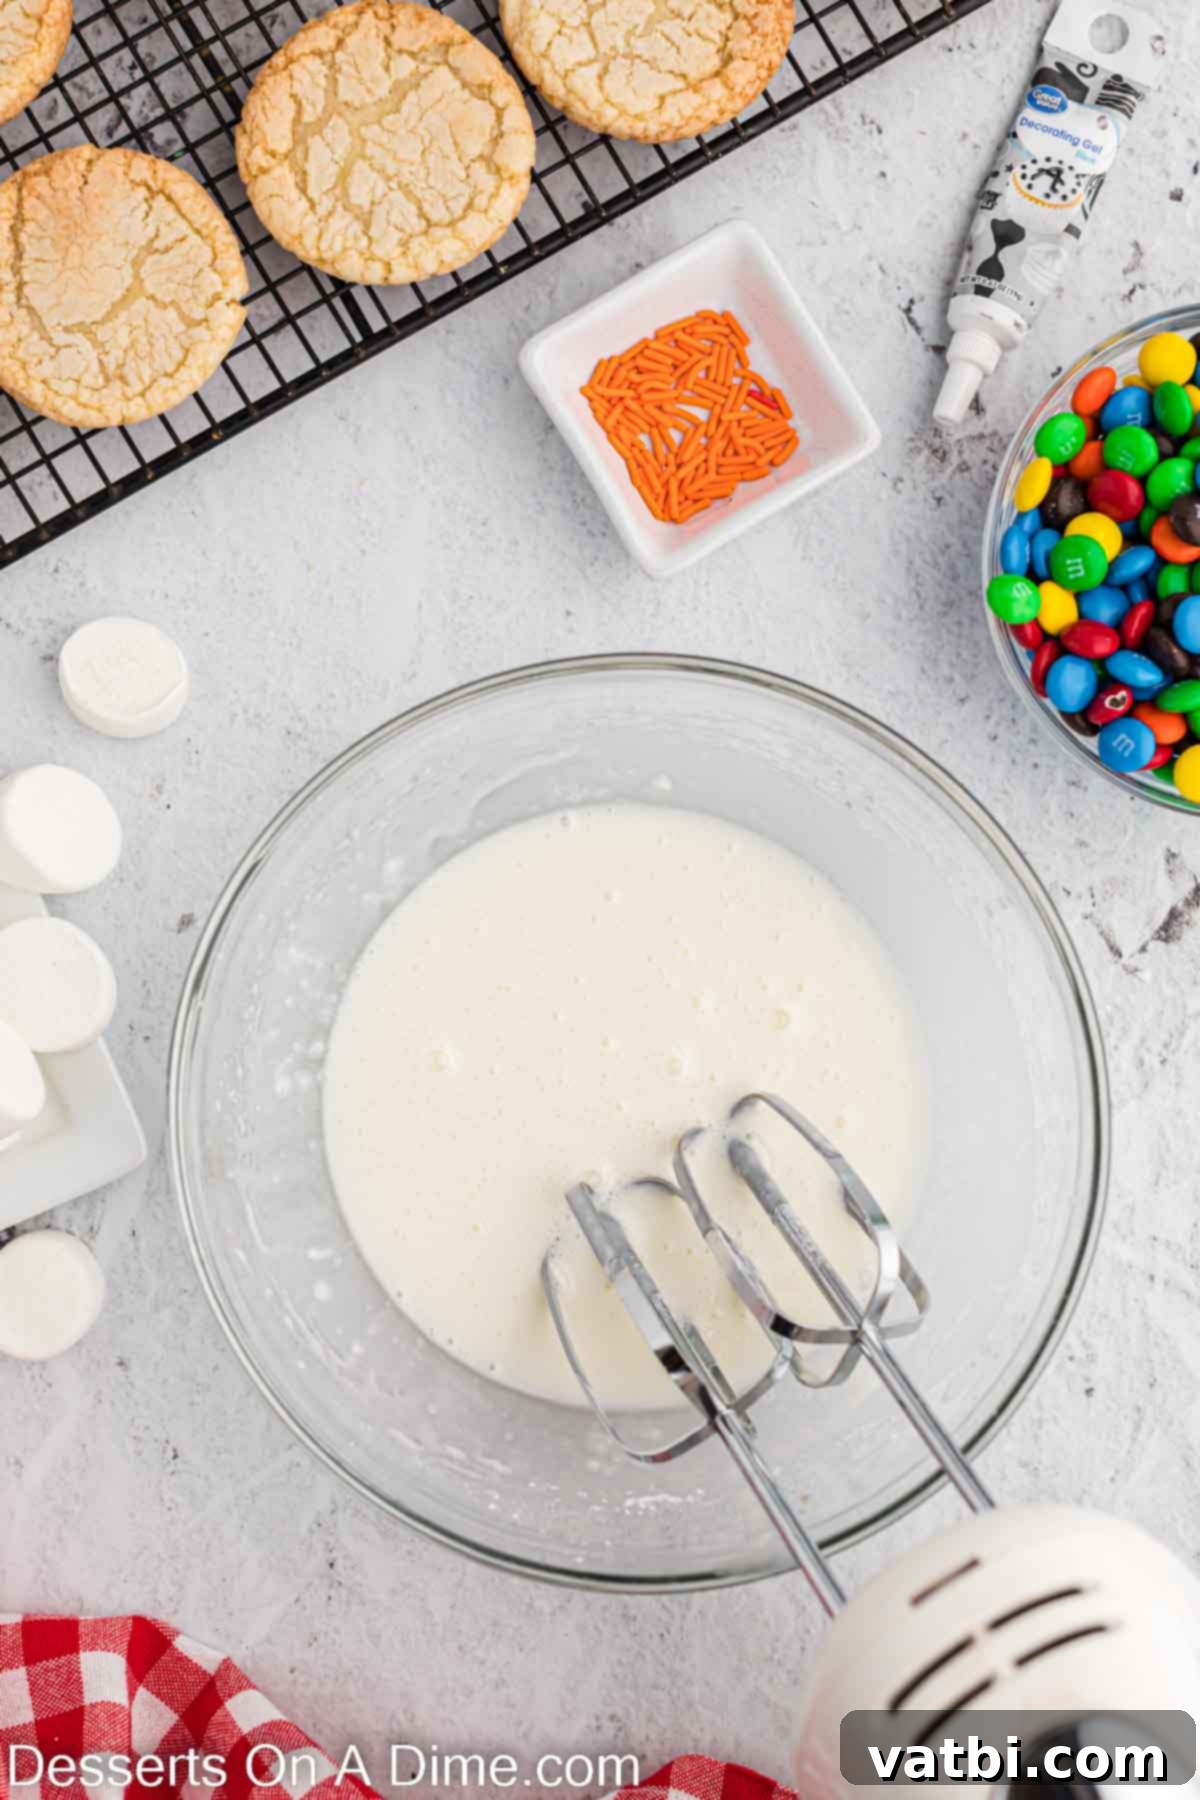
Begin by preparing your sugar cookie dough. If you are using a convenient store-bought mix, meticulously follow the package instructions to create a batch of round sugar cookies. Typically, this involves combining the dry mix with softened butter, an egg, and a small amount of water or milk in a large mixing bowl. Once your dough has come together, gently roll it out to your desired thickness and use a round cookie cutter (or even a drinking glass) to cut out circular shapes. Carefully place these cookie cut-outs onto an ungreased baking sheet, ensuring you leave adequate space between each cookie to prevent them from spreading into each other during baking. Bake in the preheated oven according to the package directions, usually until the edges are just lightly golden and the centers are set. The secret to achieving soft, chewy cookies is to avoid overbaking. As soon as they are done, carefully transfer the hot, baked cookies to a wire cooling rack and allow them to cool completely. This step is absolutely critical; attempting to decorate warm cookies will cause your royal icing to melt, slide, and create a messy outcome.
Step 2: Craft Your Silky Smooth Royal Icing
While your freshly baked cookies are cooling down, turn your attention to preparing the vibrant royal icing. In a medium-sized mixing bowl, combine the egg whites, thoroughly sifted powdered sugar (to ensure no lumps!), and the crucial cream of tartar. Using an electric mixer, beat these ingredients together on medium-high speed until the mixture reaches what is known as a “10-second consistency.” This means that if you lift your spoon or whisk and drizzle some icing back into the bowl, the line it creates on the surface should smoothly disappear and meld back into the rest of the icing within approximately 10 seconds. This consistency is absolutely perfect for both outlining the cookies and then flooding the inside to create that smooth, uniform melted snow base. Once the desired consistency is achieved, carefully transfer the royal icing into a sturdy piping bag. Snip off a very small tip from the end of the piping bag – you want a controlled, thin stream for precision in your decorating.
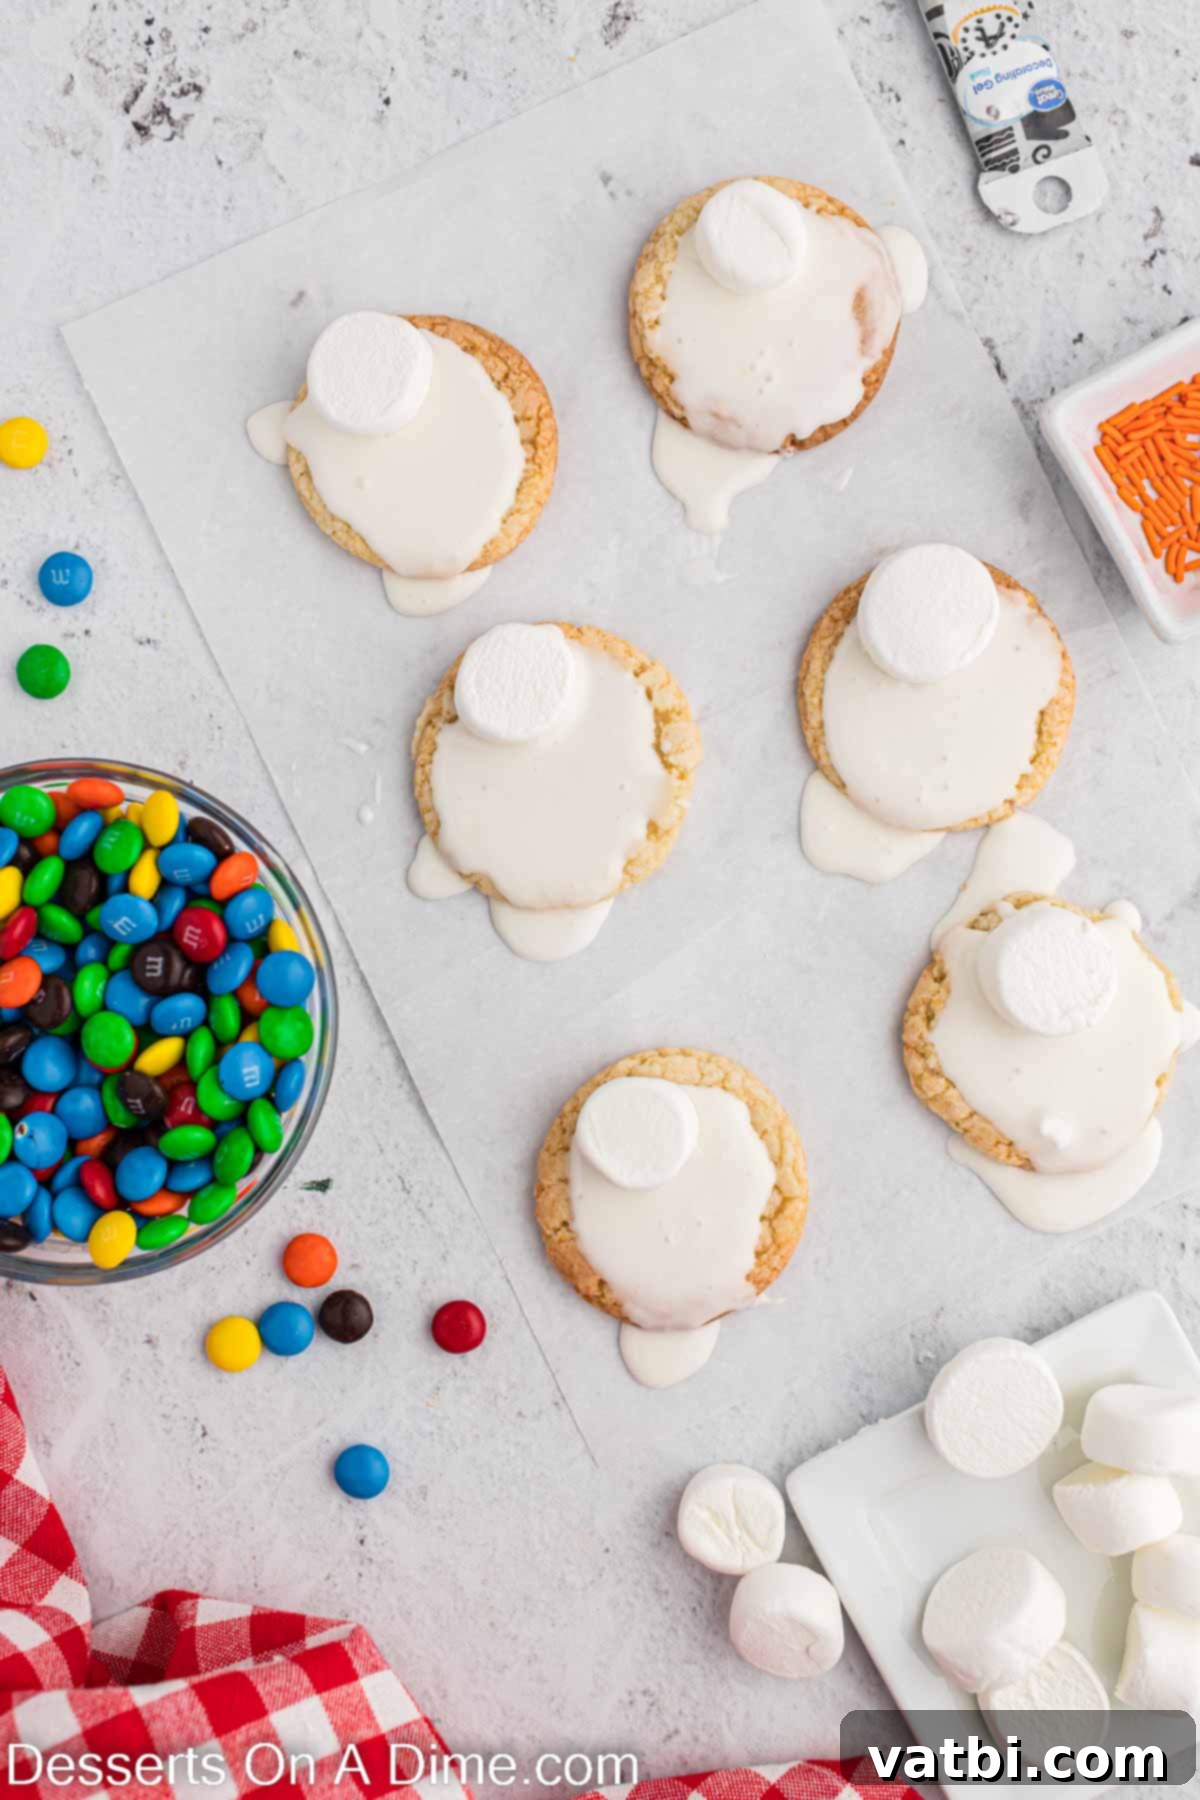
Step 3: Frost and Artfully Create the Melted Snow Effect
Once your cookies are completely and undeniably cool to the touch, it’s time for the most enjoyable part: frosting! Prepare your workspace by laying out sheets of parchment paper – this ingenious trick will make cleanup incredibly easy as any excess icing drips. Using your piping bag filled with royal icing, apply the white icing generously to the top of each cookie. Do not worry about being overly neat around the edges; in fact, you should actively encourage the frosting to drip slightly and organically over the sides of the cookies. This intentional “dripping” is precisely what creates the wonderful illusion of freshly melted snow, giving your cookies their signature whimsical and charming look. You can use a small offset spatula or the back of a clean spoon to gently spread the icing if needed, ensuring full coverage while encouraging that natural, delightful overflow.
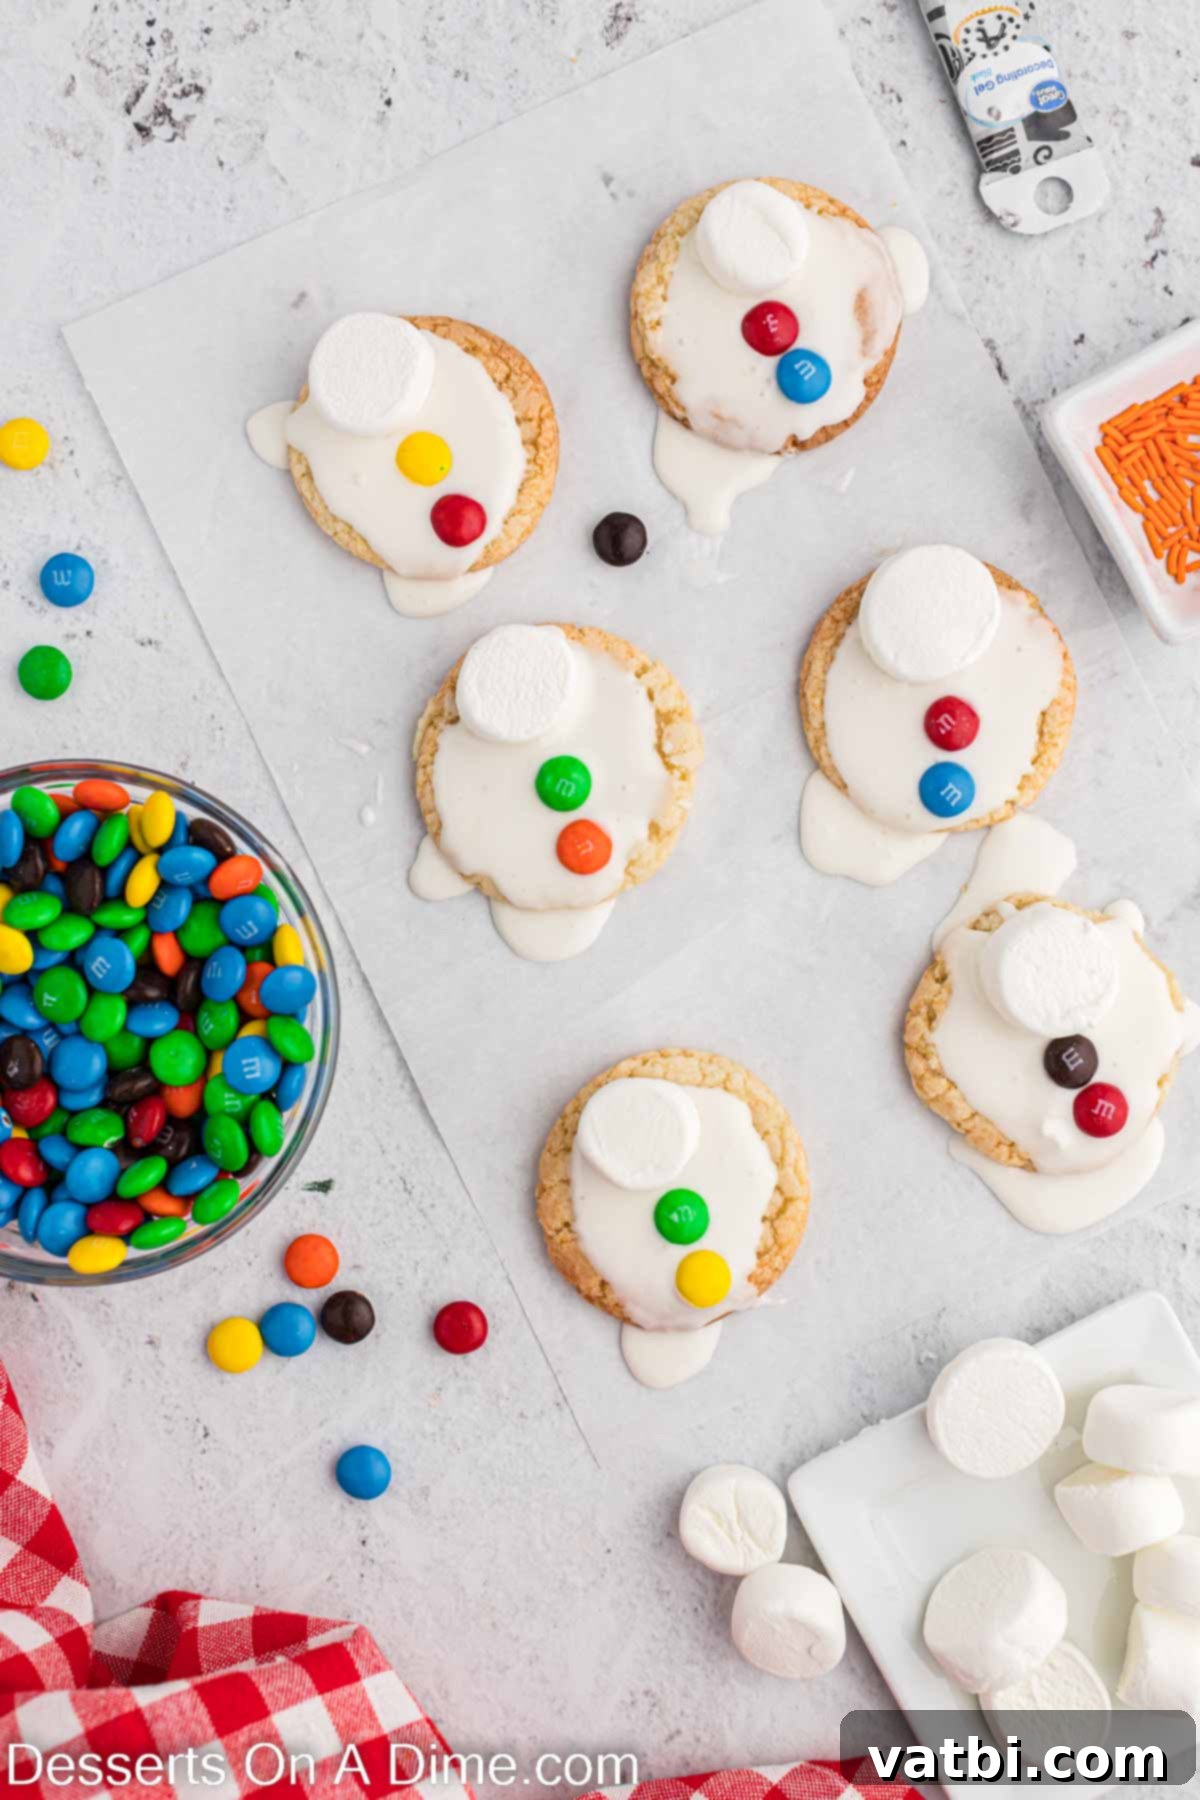
Step 4: Swiftly Add the Snowman’s Head and Buttons
This critical step requires swift and decisive action! As soon as you finish frosting a cookie with the royal icing, immediately place half of a large marshmallow onto the cookie. Position it strategically towards the upper half or the “back” of the cookie. This placement is key, as it will represent the snowman’s head whimsically emerging from the melted snow puddle. Gently press the marshmallow down so it securely adheres to the still-wet royal icing. Next, carefully place the M&M’s in the front part of the cookie, just below the marshmallow. Arrange them to playfully resemble the buttons on a snowman’s belly. You can use two or three M&M’s per snowman, depending on the size of your cookies and your desired look. It is absolutely essential to complete this step while the royal icing is still wet and pliable, ensuring that both the marshmallow and the candies firmly attach to the cookie base and don’t slide off.
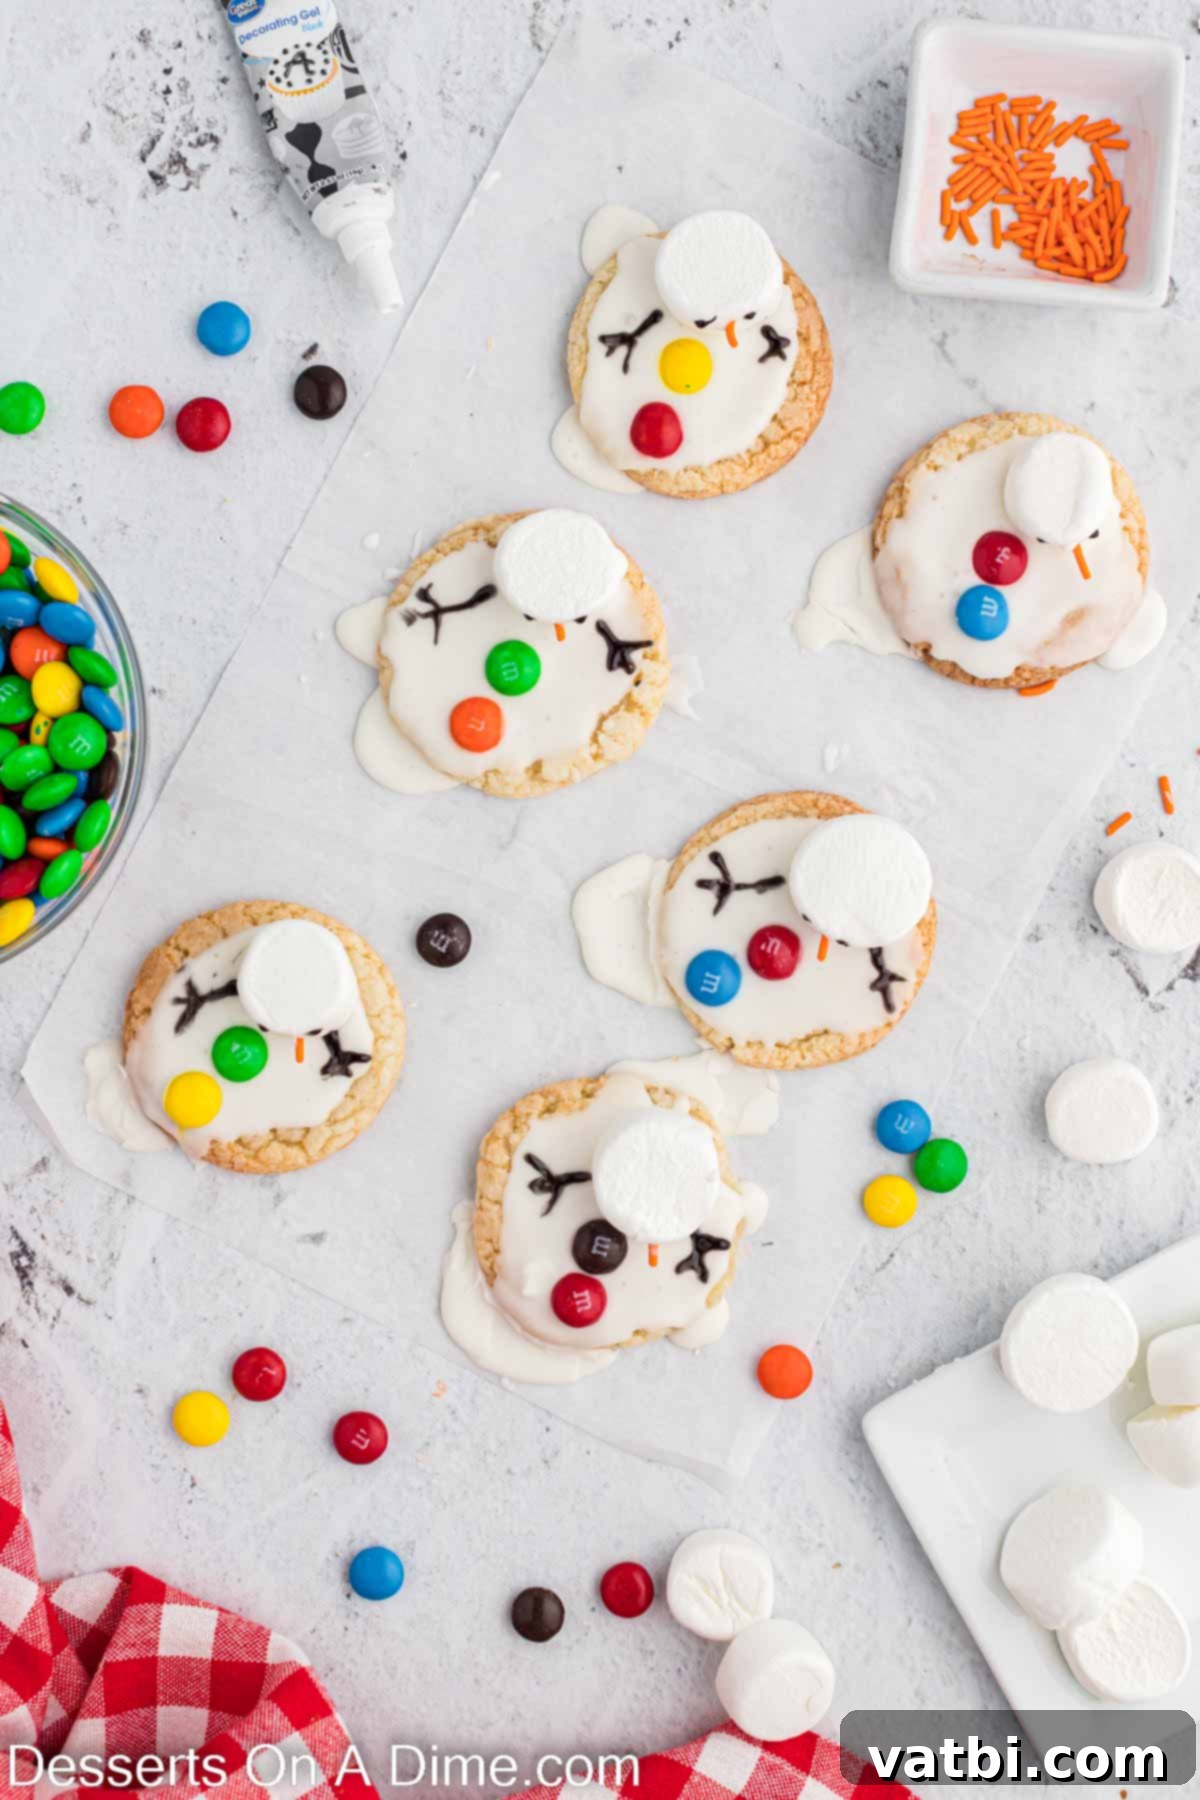
Step 5: Delicately Detail the Face, Arms, and Nose
Once all the marshmallows and M&M buttons are securely in place on your cookies, allow the royal icing to dry completely. This crucial drying period typically takes approximately 20-30 minutes, though it can vary depending on the humidity levels in your kitchen. The icing should feel firm and dry to the touch before you proceed to the next step. Once fully set, take your black decorating gel. Using its fine tip, carefully pipe two small dots for expressive eyes and a charming curved line for a friendly smile onto each marshmallow head. Next, pipe two small, thin, slightly wavy lines on either side of the “melted” body to create the snowman’s characteristic stick arms. For the quintessential carrot nose, use any leftover white royal icing (or a tiny dab of freshly prepared icing if you ran out) to attach one of the long orange sprinkles onto the marshmallow face, positioned perfectly below the eyes. Arrange your beautifully decorated melted snowman cookies on a festive cookie tray, and they are now ready to serve and bring immense joy! The artistic details truly bring these festive and unique cookies to vibrant life.
Storage Tips for Freshness
Proper storage is absolutely essential to keeping your delightful Melted Snowman Cookies fresh, flavorful, and looking their best for as long as possible. Thanks to the magic of royal icing, these cookies boast a surprisingly good shelf life, making them an excellent choice for preparing ahead of busy holiday events or for gifting.
To store any leftover Melted Snowman Sugar Cookies, place them carefully in an airtight container at room temperature. When stored correctly, they will maintain their deliciousness and festive appearance for up to 1 week. To meticulously prevent the delicate royal icing decorations from sticking together or getting damaged, it’s a highly recommended practice to place sheets of wax paper or parchment paper between layers of cookies in your storage container. This acts as a protective barrier, preserving their artistic integrity.
Crucially, before attempting any storage, ensure that the royal icing on your cookies has completely cooled and set. The icing must be firm, dry, and hardened to the touch. If you place them in the container before they have fully set and hardened, the cookies will inevitably stick to each other, resulting in smudged designs and a potentially ruined melted snowman aesthetic. Patience during the drying stage ensures your beautiful, handcrafted creations remain perfectly intact and ready for enjoyment or display.
Frequently Asked Questions About Snowman Cookies
These delightful snowman cookies will last remarkably well for up to 5-7 days when stored correctly in an airtight container at room temperature. The royal icing, once completely dry, forms a protective barrier that not only preserves the cookie’s design but also helps keep the cookie base fresh. If you need to extend their shelf life even further, these festive cookies are also perfectly freezer-friendly. To freeze them, first arrange the fully decorated and dried cookies in a single layer on a baking sheet and place them in the freezer until they are completely solid. Once frozen, transfer them to a freezer-safe container or a heavy-duty freezer bag, making sure to place sheets of wax paper or parchment paper between layers to prevent sticking and damage. They can be frozen for up to 2 to 3 months without significant loss of quality. This makes them an excellent strategic option for preparing in advance for holiday parties, school functions, or simply having homemade treats readily available throughout the entire winter season, saving you valuable time and effort when you need it most.
Decorating these melted snowman cookies is a surprisingly simple yet yields absolutely spectacular and charming results. The decorative process begins with applying a smooth, generous base coat of pristine white royal icing to each baked sugar cookie. This step serves a dual purpose: it not only provides a beautiful, clean “snow” effect but also ingeniously creates the illusion of the snowman melting into a puddle. Once this base icing is applied and is still wet and pliable, a carefully halved large marshmallow is placed towards the upper portion of each cookie to form the snowman’s comical head. Below the marshmallow, colorful M&M candies are strategically placed to represent the snowman’s buttons. After this initial layer of royal icing has dried and hardened completely (which is crucial for crisp details), the final, delicate embellishments are added. Black decorating gel is used for piping the expressive eyes, a cheerful smile, and the iconic stick arms. Finally, a long orange sprinkle is attached with a tiny dot of icing to create the adorable carrot nose. This easy-to-follow, step-by-step method ensures that even novice decorators can achieve a professional and utterly charming look for these sweet, festive treats. Don’t forget, you can always get creative with other candies and embellishments, as detailed in our variations section, to add your personal flair.
While buttercream frosting is undeniably delicious and widely loved, it’s generally not recommended for decorating melted snowman cookies if your goal is to achieve the signature “melted” look and a firm, stackable cookie. Royal icing possesses unique properties: it dries hard and smooth, allowing it to drip naturally and set into a solid, clean surface that won’t smudge, smear, or melt easily, even at room temperature. Buttercream, on the other hand, remains soft and creamy, often staying tacky to the touch. If used for these cookies, it would be significantly more challenging to achieve the distinct melted puddle effect, as it lacks the structural integrity to hold its shape once spread. Furthermore, the marshmallow head and candy buttons might not adhere as securely to soft buttercream. More importantly, soft buttercream would make the cookies exceedingly difficult to stack and transport without damage, potentially ruining your carefully crafted festive designs. For the best results, the authentic melted snowman aesthetic, and practical handling, royal icing is truly the superior and recommended choice for this specific recipe.
If your sugar cookies unexpectedly spread too much during baking, resulting in less defined rounds or fused cookies, there are a few common culinary culprits. Firstly, the butter you used might have been too soft or even partially melted before it was incorporated into the dough. Overly soft butter melts too quickly in the oven, causing the cookies to spread prematurely. Always use softened, but still cool, butter. Secondly, an imbalance in the ingredient ratios, such as too little flour or too much sugar, can significantly affect the dough’s consistency and lead to excessive spreading. If using a mix, ensure precise measurements as per the package instructions. Thirdly, an oven that isn’t preheated accurately or has inconsistent temperatures can be problematic. Always allow your oven ample time to reach the set temperature before placing cookies inside. Lastly, placing cookie dough on a warm baking sheet can cause the butter in the dough to begin melting immediately, leading to spreading before the cookies have a chance to set. Always use cool baking sheets or allow them to cool completely between batches. As an additional preventative measure, chilling your cookie dough for at least 30 minutes (or even longer) before baking can dramatically help prevent spreading and maintain their perfectly round shape, ensuring ideal bases for your adorable melted snowmen.
Expert Pro Tips for Perfect Melted Snowman Cookies
Achieving those perfectly whimsical and utterly adorable Melted Snowman Cookies is easier than you might think, especially when you have a few expert tips up your sleeve. These invaluable pointers will help ensure your cookies not only look fantastic and professional but are also a sheer joy to make and, most importantly, a delight to eat.
- Mastering Royal Icing Application Techniques:
- Outline First for Control: While the ultimate goal is a charming melted look, for a cleaner, more controlled edge and to define the precise “puddle” size, it’s often easiest to first pipe a thin outline of royal icing around the entire perimeter of the cookie. Allow this outline to set for just a minute or two (it dries quickly) before you proceed to “flood” the inside with more icing. This subtle barrier effectively prevents too much overflow and helps create a more uniform and intentional melted appearance.
- Achieving the Right Consistency is Key: The “10-second consistency” mentioned in the recipe is paramount for success. If your icing is too thin, it will uncontrollably run off the cookies entirely, creating a mess. Conversely, if it’s too thick, it won’t spread smoothly enough to create that desirable melted puddle effect. It’s always a good idea to practice with a small amount of icing on a piece of parchment paper to test its flow. You can subtly thin the icing with a tiny drop of water (add sparingly!) or thicken it with a little more sifted powdered sugar until you reach that perfect drip.
- Decorate Promptly and Efficiently for Adhesion:
- Timing is Everything for Adhesion: The marshmallows and all candy decorations must be added to the royal icing while it is still wet and pliable. Royal icing sets quite rapidly, and if it dries even slightly, your decorations will not adhere properly and may fall off once the cookies are moved or stored.
- Work One Cookie at a Time: To ensure optimal adhesion for all your embellishments, it is highly recommended to decorate one cookie completely (applying icing, then immediately placing the marshmallow and M&Ms) before moving on to the next. This methodical approach prevents the icing from setting prematurely on other cookies while you are still actively working on previous ones.
- The Essential Marshmallow Cut for Authenticity:
- Halved Marshmallows are Non-Negotiable: Do not, under any circumstances, forget to cut your large marshmallows in half horizontally. This isn’t merely a suggestion; it is an absolute necessity for achieving the correct aesthetic. A whole marshmallow would appear disproportionately tall and bulky, significantly detracting from the whimsical “melted” illusion. Cutting it in half creates a flatter, more proportional snowman head that appears to be delightfully sinking into the snow puddle. It only takes a minute to cut them all, so make sure this crucial preparatory step is completed before you even begin the decorating process.
- Cookie Cooling is Absolutely Non-Negotiable:
- Patient and Complete Cooling: Just as with any decorated cookie project, it is paramount to ensure that your sugar cookies are completely and thoroughly cool before you even think about applying any icing. Even slightly warm cookies will cause the royal icing to melt, slide, and create a sticky, unsightly mess instead of a beautifully defined melted snowman. Allow ample time for cooling, perhaps even chilling them for a few minutes if your kitchen is warm.
- Precision with Piping Bag Control for Details:
- Use a Small Tip for Fine Details: When it comes to piping the delicate faces (eyes and mouths) and the distinct stick arms with black decorating gel, utilizing a very small tip on your piping bag, or carefully snipping a tiny hole if you’re using a disposable bag, is crucial. This allows for incredibly fine lines and expressive details, which will truly bring your unique snowman characters to vibrant life with individual personalities.
More Decorated Cookie Recipes to Explore
If you loved creating these Melted Snowman Cookies, you might enjoy exploring more festive and fun decorated cookie recipes. These are perfect for various holidays and occasions:
- Christmas Cut Out Sugar Cookies: A classic holiday favorite, perfect for decorating with various festive shapes and colors.
- Easy Christmas Tree Sugar Cookies: Simple yet stunning cookies that capture the spirit of the Christmas season.
- Thanksgiving Sugar Cookies Recipe: Adorable and delicious cookies designed to celebrate the autumn harvest and gratitude.
We truly hope you enjoy making these fun and festive Melted Snowman Cookies for Christmas or any winter occasion. They are an absolute blast to create and an even bigger joy to share with loved ones. We love hearing about your baking adventures and seeing your unique snowman creations. Please feel free to leave a comment below and share your thoughts, any helpful tips you discovered, or any creative variations you came up with. Your feedback and experiences are incredibly valuable and inspiring to us!
Melted Snowman Cookies Recipe
Rating: 5 out of 5 from 7 votes
These delightful Melted Snowman Cookies are incredibly fun to make and a joy to eat, promising to be a whimsical hit at any gathering.
Prep Time: 15 mins
Cook Time: 10 mins
Drying Time: 20 mins (for icing to completely dry)
Total Time: 45 mins
Servings: 24 cookies
Cuisine: American
Course: Dessert
Calories: 157 kcal
Author: Carrie Barnard
Ingredients
FOR THE COOKIES:
- 1 pkg Sugar Cookie Mix
- *Ingredients to make the cookies based on the package instructions (e.g., butter, egg, water/milk)
- 12 Large Marshmallows, cut in half
- Long Orange Sprinkles (for the nose)
- 1 cup M&Ms (for buttons)
- Black Decorating Gel (for eyes, mouth, and arms)
FOR THE ROYAL ICING:
- 2 Egg Whites
- 1 Cup Powdered Sugar (sifted)
- 1/2 teaspoon Cream of Tartar
Instructions
- Prepare the sugar cookie dough according to package instructions for round cookies. Bake and then let the cookies cool completely on a wire rack before decorating.
- In a mixing bowl, beat together the egg whites, sifted powdered sugar, and cream of tartar until the royal icing reaches a “10-second consistency.” Transfer the icing to a piping bag with a small tip.
- Frost each cooled cookie with the white royal icing. Allow some icing to drip over the sides to create the melted snow effect.
- Immediately, while the icing is still wet, place half of a marshmallow onto the top-back portion of each cookie (for the snowman’s head). Then, place 2-3 M&Ms on the front part of the cookie to resemble buttons.
- Allow the royal icing to dry completely (approximately 20-30 minutes, or longer depending on humidity). Once dry, use the black decorating gel to pipe small dots for eyes, a curved line for a smile, and two thin lines for stick arms onto each snowman.
- For the carrot nose, use a tiny dot of leftover white icing to attach a long orange sprinkle onto the marshmallow face.
- Let the decorating gel and nose icing dry completely. Once fully set, your whimsical Melted Snowman Cookies are ready to serve and enjoy!
Recipe Notes
Storage: Store leftover cookies in an airtight container at room temperature for up to 1 week. Ensure they are fully set and dry before storing to prevent sticking; place wax paper between layers for extra protection.
Cookie Base: Any sugar cookies work great for this recipe. Feel free to use your favorite homemade recipe (like a 3-ingredient sugar cookie) or purchase store-bought round sugar cookies for convenience. The key is to have a sturdy, flat base for decoration.
Nutrition Facts
Calories: 157 kcal, Carbohydrates: 31g, Protein: 1g, Fat: 3g, Saturated Fat: 1g, Polyunsaturated Fat: 0.01g, Monounsaturated Fat: 0.01g, Trans Fat: 0.02g, Cholesterol: 1mg, Sodium: 72mg, Potassium: 15mg, Fiber: 0.2g, Sugar: 22g, Vitamin A: 19IU, Vitamin C: 0.1mg, Calcium: 10mg, Iron: 0.2mg
