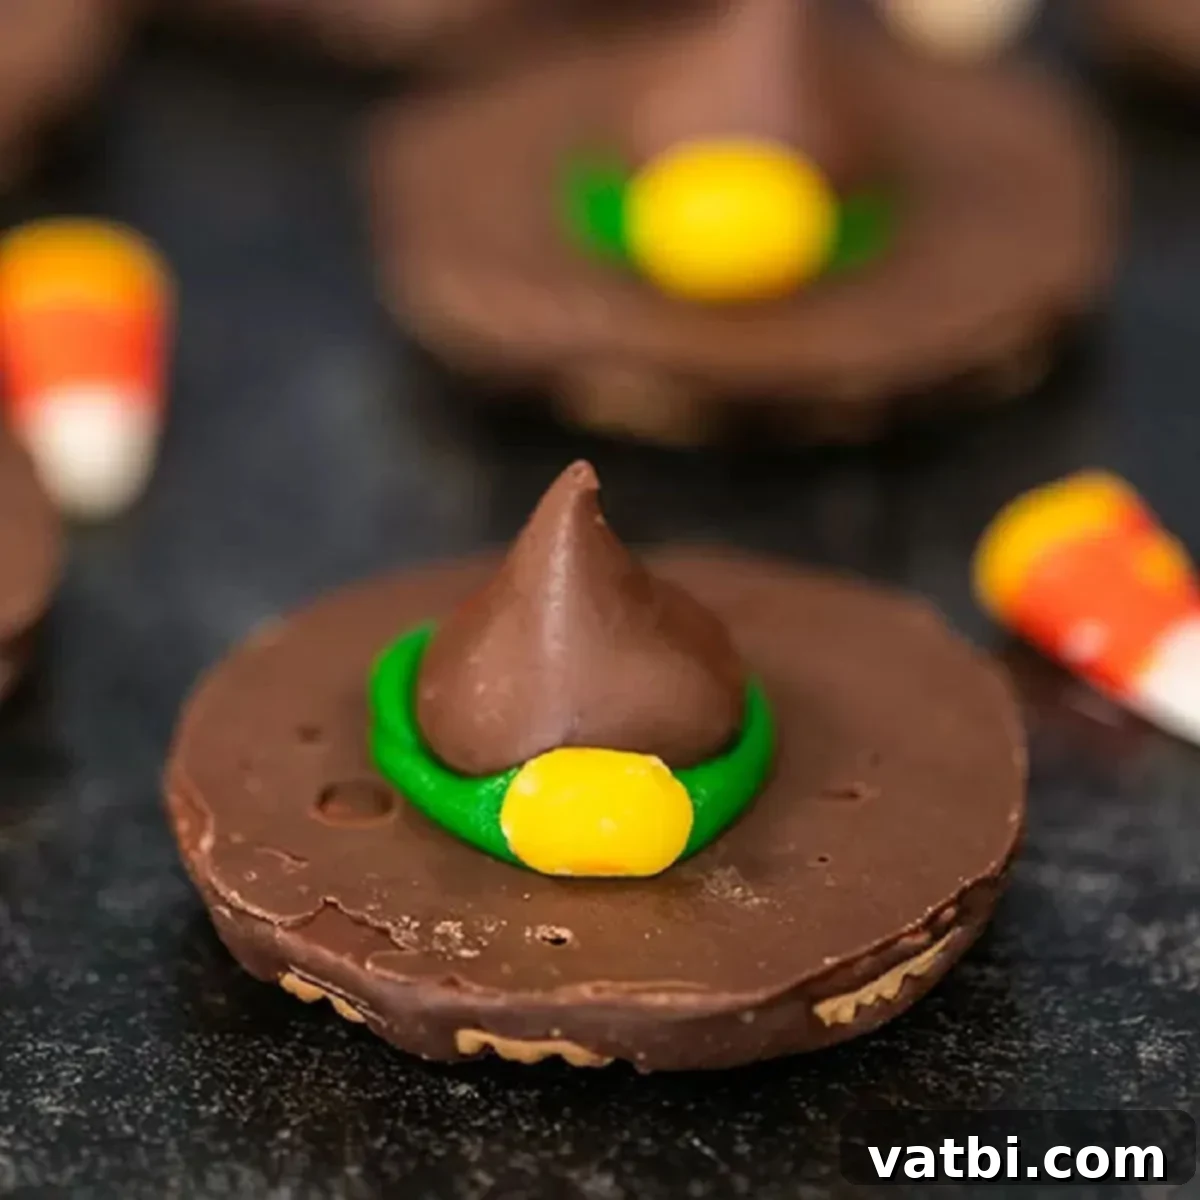
Easy No-Bake Witch Hat Cookies: The Perfect Halloween Treat for Kids and Parties
Get ready for a touch of Halloween magic with these delightful Witch Hat Cookies! This recipe delivers the ultimate no-bake treat, making them incredibly simple and a blast to prepare. Whether you’re hosting a Halloween party, preparing school treats, or just looking for a fun activity with the kids, these charming witch hat cookies are sure to be a hit. With their iconic shape and festive decorations, they bring a touch of whimsy to any spooky celebration with minimal effort.
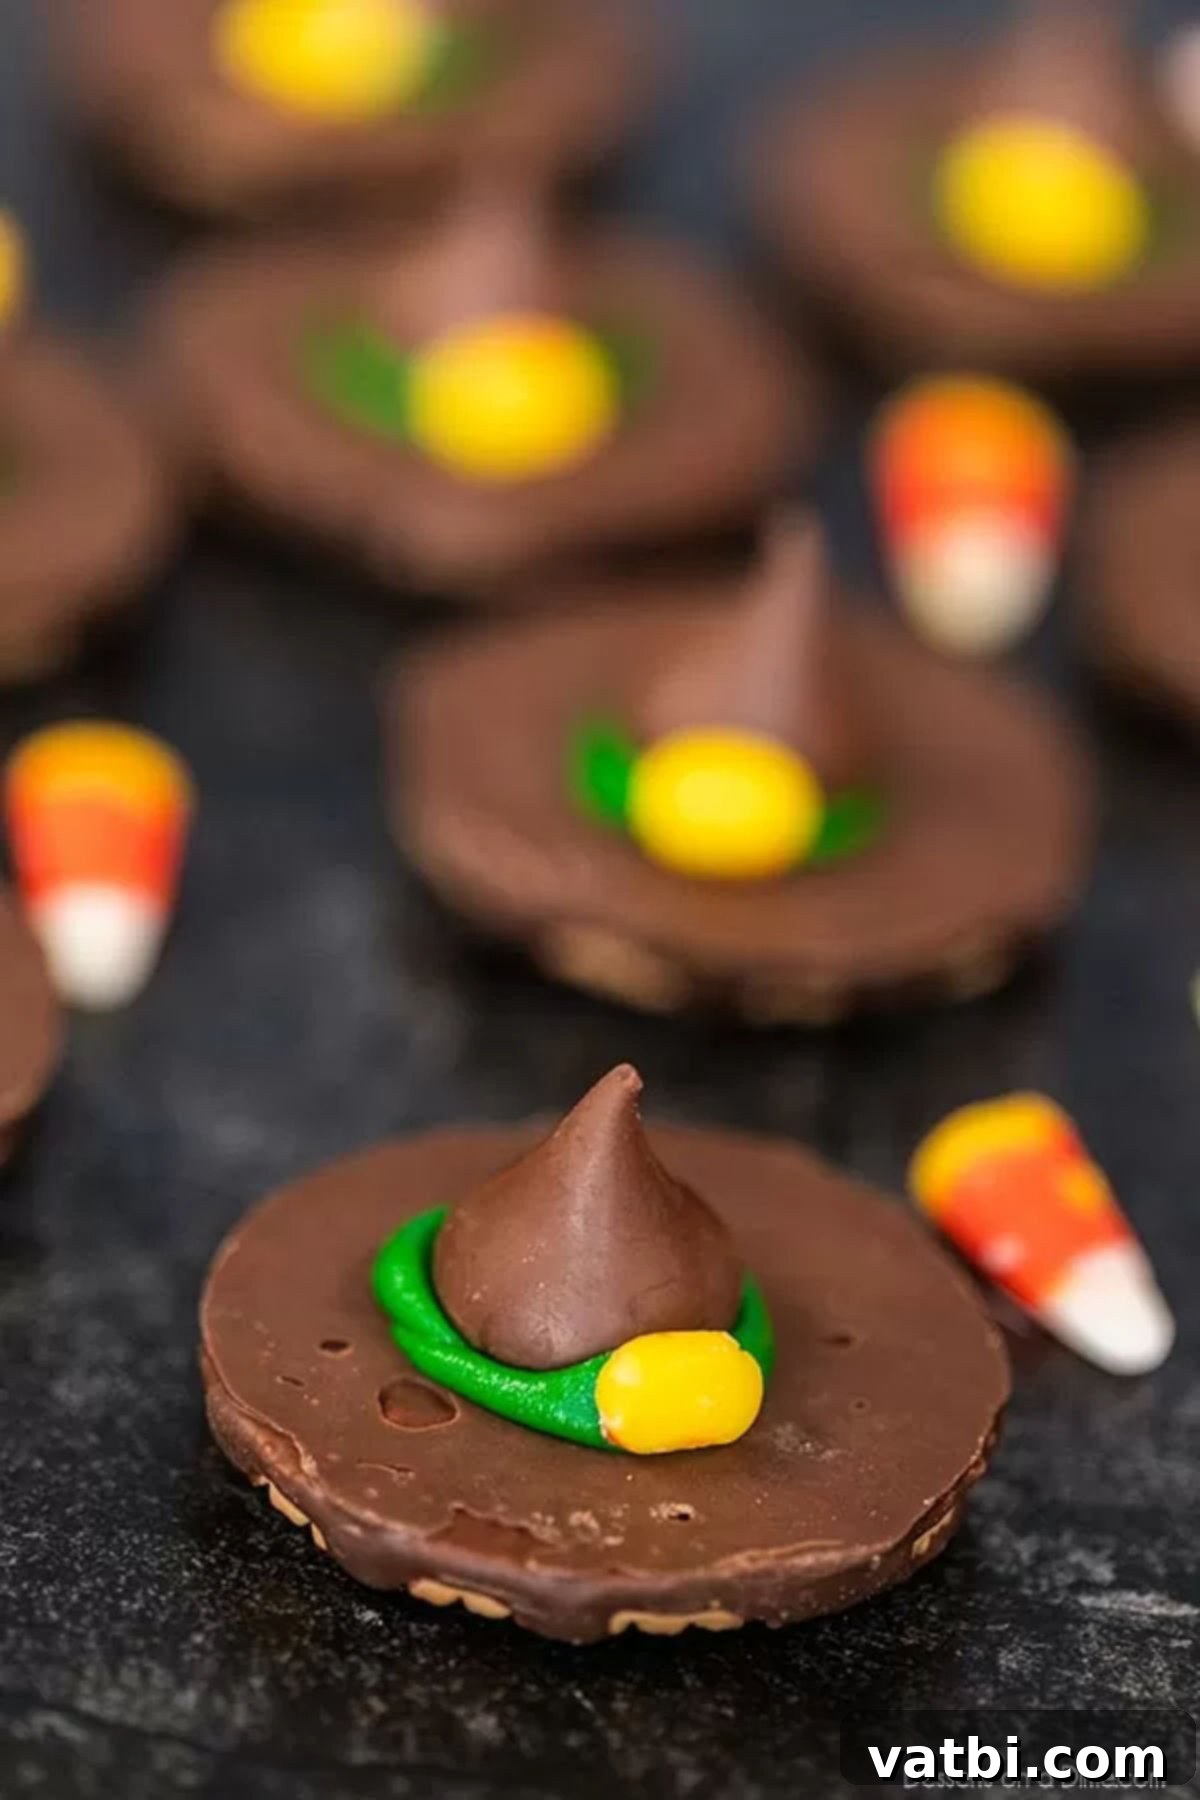
Are you searching for a genuinely simple yet undeniably festive treat for your upcoming Halloween festivities? Look no further! These witch hat cookies are not only an easy no-bake Halloween treat but also incredibly tasty and quick to assemble. In fact, their straightforward nature makes them an ideal project for little hands, allowing your children to get involved in the spooky season’s culinary fun. You only need a handful of readily available ingredients – just four essential items – to bring these adorable witch cookies to life, making them perfect for last-minute party preparations or an impromptu family baking session.
During the entire month of October, we absolutely adore whipping up easy Halloween treats. If these charming Witch Hat Cookies capture your imagination as much as they do ours, we highly recommend exploring some of our other fantastic Halloween dessert ideas. Popular choices include our spooky Halloween Dirt Cups, the addictively crunchy Halloween Puppy Chow, delightfully eerie Spider Web Cupcakes, and the ever-popular Halloween Cake Pops – all perfect for any ghoulish gathering. For those who prioritize no-bake options, you’ll also love our quirky Frankenstein Rice Krispie Treats, beautifully decorated Pumpkin Sugar Cookies, or the ultimate breakfast (or dessert) delight, The Best Halloween Donuts Recipe.
Discover even more delightful Halloween Cookie Recipes to expand your spooky repertoire. And if you’re in the mood for baking but prefer to keep things uncomplicated, learn how to effortlessly make delicious Cake Mix Cookies – a testament to simple, delicious baking.
What’s in this post: Witch Hat Cookies
- Why You’ll Adore These No-Bake Witch Hat Cookies
- Ingredients for Witch Hat Cookies
- Creative Substitutions and Additions
- Step-by-Step Instructions for Assembly
- Top Tips for Perfect Witch Hat Cookies
- Frequently Asked Questions
- More Spooktacular Halloween Treat Recipes
- Witch Hat Cookies Recipe Card
Why You’ll Adore These No-Bake Witch Hat Cookies
There are countless reasons to fall in love with this easy Witch Hat Cookie recipe, making it a staple for your Halloween celebrations. First and foremost, the sheer simplicity is unbeatable. You only need a few basic ingredients and no oven required, making it a truly stress-free option for busy schedules. This also means you won’t heat up your kitchen, which is a bonus if you’re preparing other dishes for a Halloween feast.
Beyond the ease, these cookies are incredibly versatile. You can easily customize them with a variety of cookie bases, chocolate topping choices, and an assortment of candies for decoration. This adaptability allows you to tailor them to different tastes or dietary preferences within your family or party guests. They’re also wonderfully kid-friendly, providing a fantastic opportunity for children to get creative and help in the kitchen. The assembly process is straightforward enough for even young children to participate, fostering a sense of accomplishment and making lasting Halloween memories.
Finally, these adorable hat cookies are the perfect grab-and-go treat for any Halloween party. Their no-bake nature means no last-minute baking pan emergencies, and their sturdy construction makes them easy to transport. They look impressive on a dessert table without requiring any advanced decorating skills, instantly adding a festive and spooky touch to your spread. This recipe proves that you don’t need to be a gourmet baker to create show-stopping Halloween sweets!
Ingredients for Witch Hat Cookies
Gathering your ingredients for these magical witch hat cookies is quick and simple. You’ll likely find most of these items in your pantry or a quick trip to the grocery store. Precision isn’t paramount here, making it a forgiving and fun recipe.
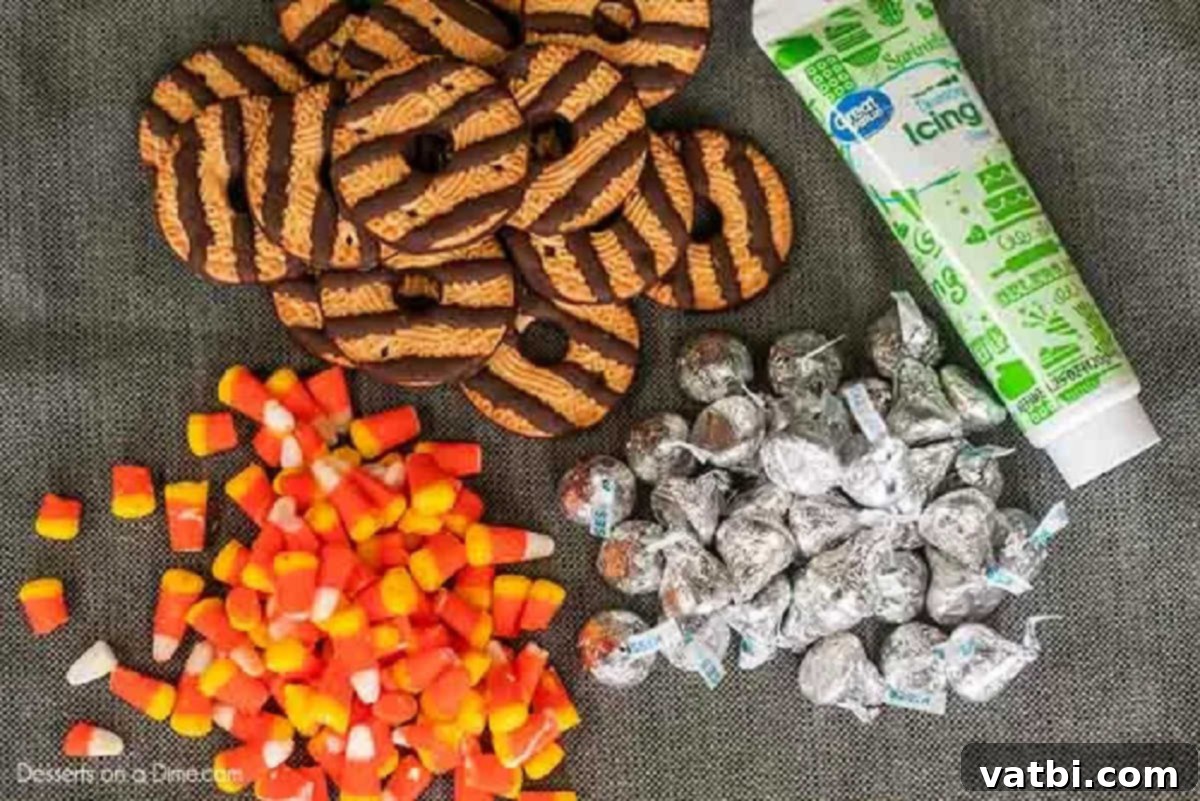
- Fudge Stripe Cookies: These classic cookies form the sturdy, chocolatey base of our witch hats. Their flat, chocolate-covered side provides the perfect surface for the “hat” to sit on.
- Chocolate Kisses: Unwrap these iconic chocolate candies to serve as the pointy top of each witch hat. Their conical shape is absolutely ideal for this design.
- Candy Corn: The distinctive yellow portion of candy corn will be carefully trimmed to create the charming buckle accent on the hat’s brim, adding a pop of color and a traditional Halloween feel.
- Green Decorating Icing: Look for ready-made decorating icing in the baking aisle. This vibrant green icing acts as the “glue” that holds the chocolate kiss to the cookie, while also forming the decorative brim of the hat.
For precise measurements and any additional helpful notes, be sure to consult our comprehensive recipe card provided at the end of this post.
Creative Substitutions and Additions for Your Witch Hat Cookies
One of the best aspects of these no-bake witch hat cookies is their incredible adaptability! Don’t be afraid to get creative and customize them to your liking or to suit whatever ingredients you have on hand. Here are some fantastic ideas to spark your imagination:
- Change the Icing Color: While classic green is wonderful, feel free to use any color icing that strikes your fancy! Purple, orange, or even black icing would look wonderfully spooky and festive. You can use store-bought icing for ultimate simplicity, or if you prefer a homemade touch, you can easily whip up your own buttercream or royal icing and tint it with gel food coloring. This allows for even more personalized designs.
- Candy Melts for Frosting: Instead of traditional icing, consider melting candy melts in your desired color. You can use green, purple, or orange candy melts to create a smooth, colorful layer on your cookies. Simply melt them according to package directions, spread a thin layer on the cookies, and then attach the chocolate kisses. This method creates a firm, shiny finish once set. You can also use regular frosting for a softer bite.
- Alternate Candy “Buckles”: The candy corn buckle is iconic, but you have other fun options! Small M&M’s candies (especially yellow or orange ones) work perfectly for a round buckle, or you could use red hots for a tiny, spicy kick and a contrasting color. For a different chocolate experience, consider using Hershey’s Hugs (the white chocolate swirled kisses) instead of the milk chocolate ones, creating a lighter-colored “hat.”
- Experiment with Different Cookies: The base cookie is crucial, but you’re not limited to fudge stripe cookies. Regular Oreos or other chocolate cream-filled cookies are excellent alternatives, providing a similar sturdy base and chocolate flavor. Peanut butter cookies can also offer a delicious twist, especially if you love the combination of peanut butter and chocolate. You could even use sugar cookies or shortbread cookies for a less intensely chocolate base.
- Chocolate Chips for Simple Decoration: If candy corn isn’t available or you prefer a simpler look, a single chocolate chip can be placed at the base of the chocolate kiss to act as a mini, elegant buckle. This provides a subtle detail without the bright color of candy corn.
- Add a Peanut Butter Layer: For a truly decadent treat, spread a thin layer of creamy peanut butter on top of your fudge-striped cookie before placing the Hershey’s Kiss. This creates a wonderful flavor combination that peanut butter lovers will adore, while also acting as an extra adhesive for your witch hat.
- Sprinkles: To elevate the festivity, don’t hesitate to add a dusting of Halloween-themed sprinkles! Orange, black, purple, or even glittery sprinkles can be scattered on the icing before it sets, adding extra sparkle and fun to your witch hats.
Step-by-Step Instructions for Assembly
Crafting these adorable witch hat cookies is a straightforward and enjoyable process. Follow these simple steps to assemble your spooky treats:
- Step 1 – Prepare Your Cookie Base: Begin by taking each fudge stripe cookie and placing it face down on a clean work surface or a parchment-lined baking sheet. The chocolate-coated side, which typically has the fudge stripes, should be facing up. This forms the perfect dark “brim” for your witch hat.
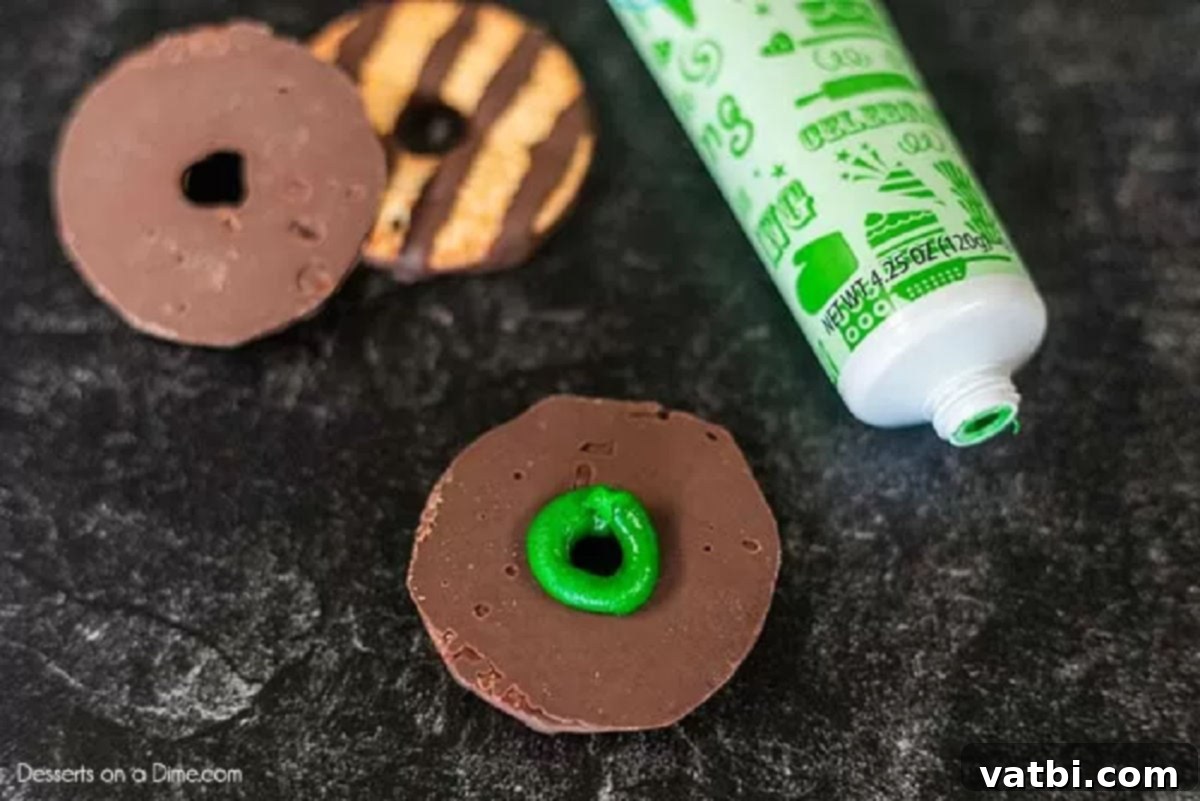
Step 2. Apply the Icing: Using your pre-made decorating frosting (ensure it’s at room temperature for easy piping), create a neat circle of icing directly around the center of the upside-down cookie. This ring of icing will serve as both the adhesive and the decorative base for your hat, mimicking a witch’s hat brim.
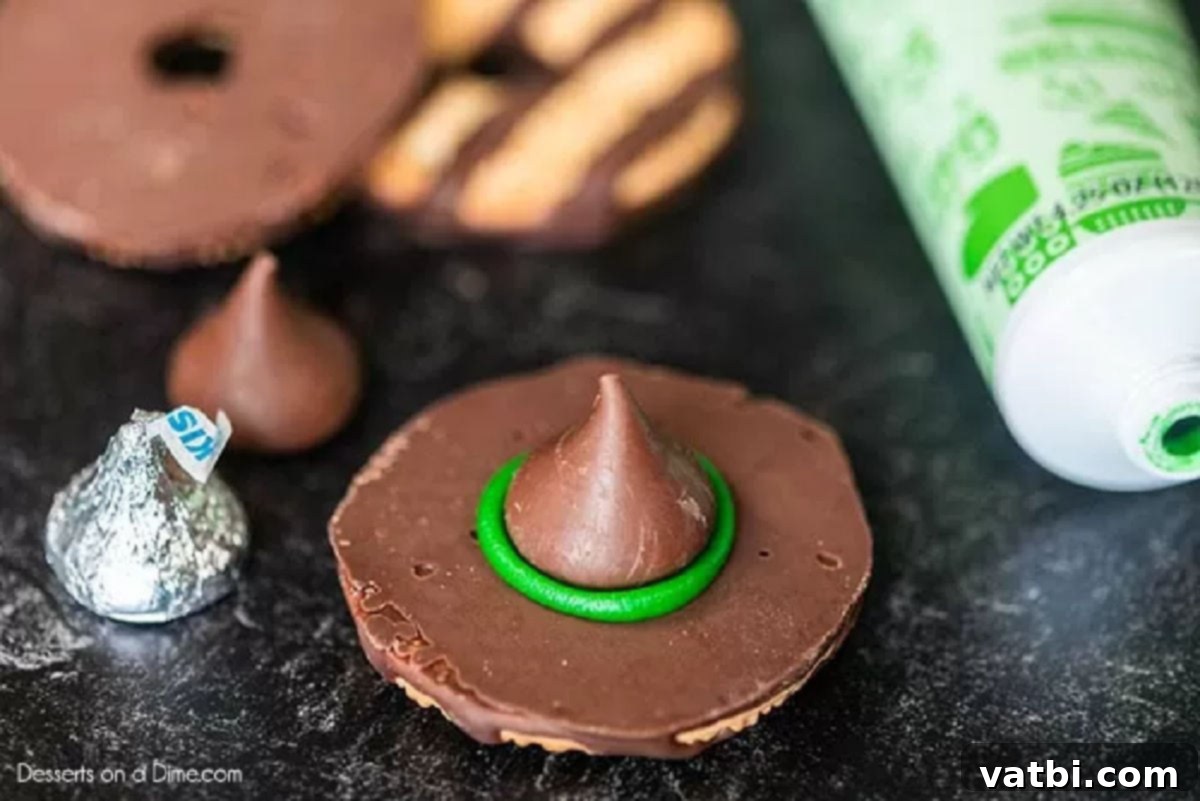
Step 3. Add the Chocolate Hat Top: Carefully place an unwrapped Hershey’s Kiss on top of the icing circle in the center of each cookie. Gently press the chocolate candy into the icing. As you press, the icing should slightly seep out from under the sides of the Hershey’s Kiss, further enhancing the appearance of a hat brim and securing the “hat” in place.
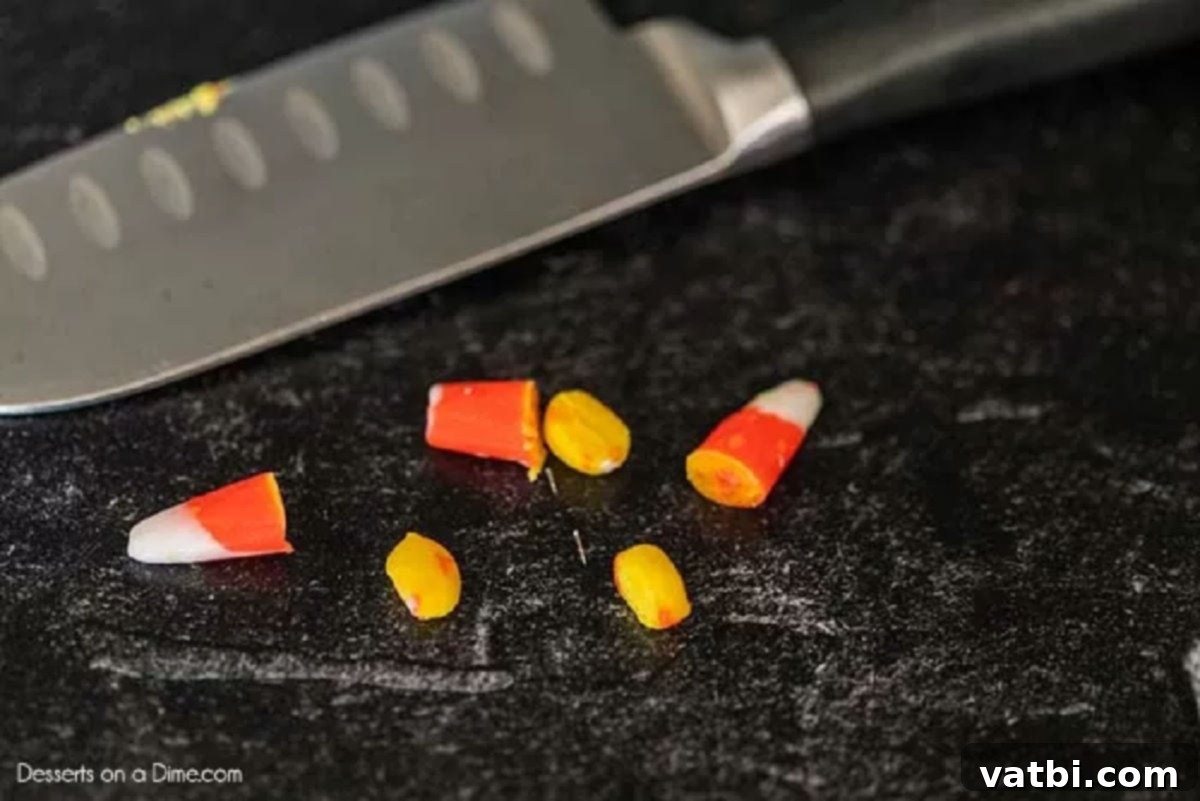
Step 4. Prepare the Buckles: Using a small, sharp knife, carefully cut off only the yellow portion from each piece of candy corn. These small yellow pieces will become the iconic buckle on your witch hats. Be precise for the best visual effect.
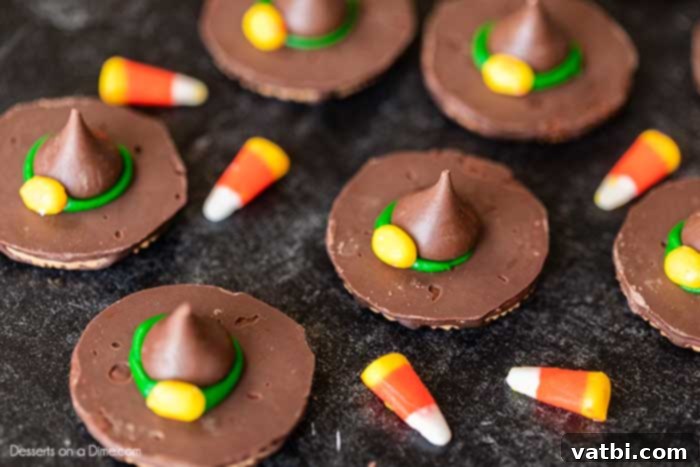
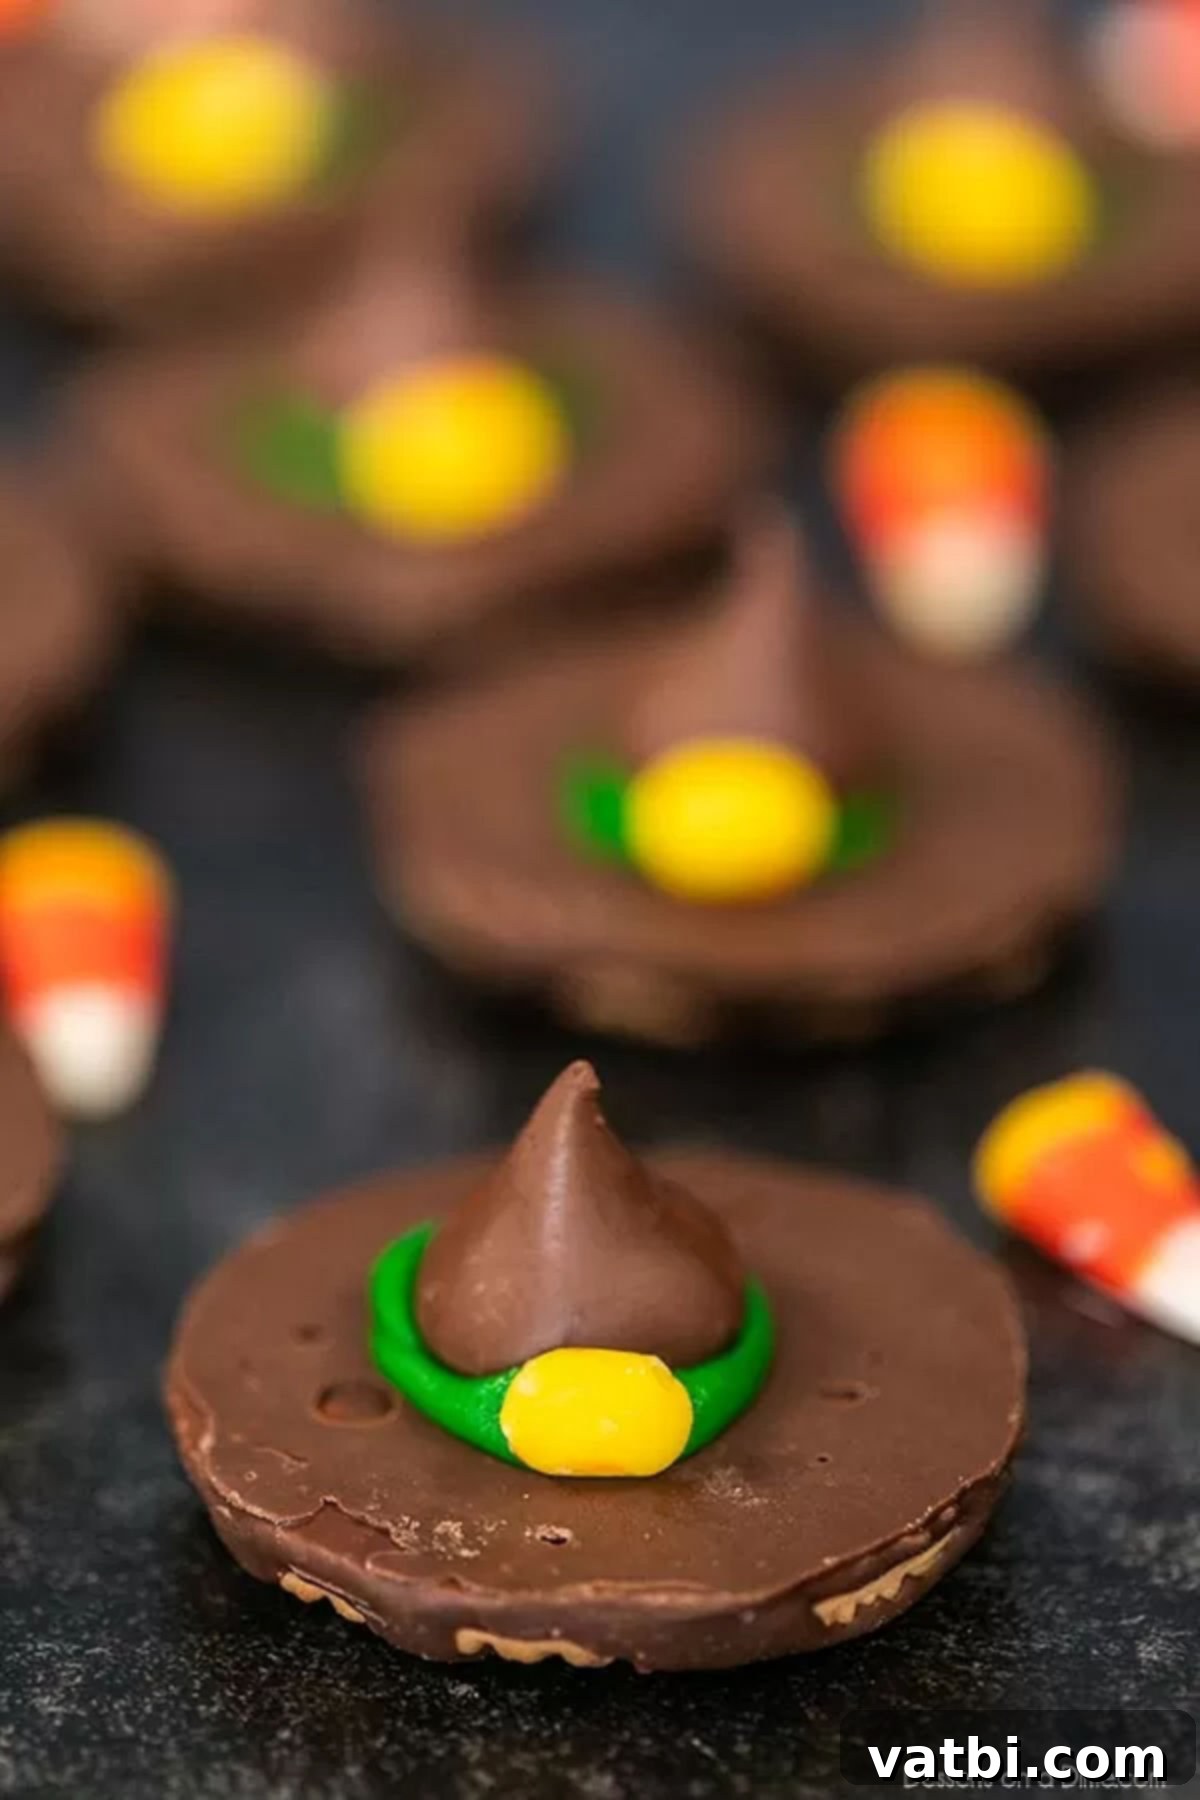
Step 5. Add the Buckles and Set: Gently place one yellow candy corn piece onto the center of the icing brim, positioned against the base of the Hershey’s Kiss, to create the appearance of a hat buckle. Allow the cookies to set for a few minutes to ensure the icing hardens slightly and everything adheres properly. If you’re in a hurry, you can chill them in the refrigerator for about 10-15 minutes to speed up the setting process. Once set, your witch hat cookies are ready to serve and enjoy!
Top Tips for Perfect Witch Hat Cookies
Achieving perfectly adorable and delicious Witch Hat Cookies is easy with a few simple tips. These suggestions will help ensure your treats turn out beautifully and are ready to impress:
- Ensure Room Temperature Frosting: This is a crucial step! Make certain your decorating icing is at a soft, spreadable room temperature before you begin. Cold, stiff icing will be difficult to pipe smoothly and won’t create that perfect “brim” effect as easily. If it’s too thick, you can gently warm it slightly in the microwave for a few seconds (stirring well), but be careful not to melt it completely.
- Work Efficiently: Once you apply the frosting, try to add the chocolate kiss and candy corn buckle fairly quickly. This ensures that the icing hasn’t started to set too much, allowing all the components to stick together securely. If you’re making a large batch, consider working in small groups of 5-10 cookies at a time.
- Allow Adequate Setting Time: While these are no-bake, they do need a few minutes for the icing to firm up and bind the cookie, chocolate, and candy corn together. This prevents your hats from sliding off! Aim for at least 15-20 minutes at room temperature, or as mentioned, chill them in the refrigerator for about 10-15 minutes for a quicker set.
- Careful Handling for Serving: Once set, these cookies are quite stable. If you’re planning to serve them on a large cookie platter or transport them to a party, it’s a good idea to keep them covered lightly with plastic wrap. This protects them from dust and helps prevent them from drying out, keeping them fresh and visually appealing.
- Involve the Kids Safely: This is a fantastic recipe for kids to help with! Assign age-appropriate tasks. Younger children can unwrap chocolate kisses and place them on the cookies, while older children can assist with piping the icing (with supervision) and carefully adding the candy corn buckles. Adult supervision is recommended for cutting the candy corn.
- Presentation Matters: To make your witch hat cookies truly stand out, arrange them creatively on a serving platter. You can scatter some extra candy corn or Halloween sprinkles around them, or even place them on a bed of dark chocolate sprinkles to simulate “dirt.”
Frequently Asked Questions About Witch Hat Cookies
Here are some common questions about making and storing these festive no-bake treats:
To keep your witch hat cookies fresh and delicious, store them in an airtight container at room temperature. For best results and to prevent them from sticking together, you can place a piece of parchment paper between layers of cookies. While these fun Halloween cookies typically disappear quickly in my house, they should remain fresh for about a week. Keep them away from direct sunlight or heat, as this can cause the chocolate to melt or the icing to soften.
Absolutely, yes! While store-bought fudge stripe cookies offer ultimate convenience, you can certainly bake your own cookies from scratch to use as the base. We particularly love using our Toll House Chocolate Chip Cookies Recipe for this purpose. When making homemade cookies, aim for a flatter, sturdier cookie that will provide a good foundation for the Hershey’s Kiss. Make sure they are completely cooled before assembling your witch hats to prevent melting the chocolate or icing.
Yes, these no-bake witch hat cookies are perfect for making ahead! You can prepare them 1-2 days in advance of your event. Just be sure to store them in an airtight container at room temperature, ideally with parchment paper separating the layers to prevent them from sticking or damaging the decorations. This makes party planning much easier, as you’ll have one less thing to worry about on the day of your celebration.
No green icing? No problem! You have several options. You can use white frosting and tint it green using a few drops of green food coloring (gel food coloring provides more vibrant results). Alternatively, embrace a different color scheme! Purple, orange, or even black icing would create equally festive and spooky witch hats. Chocolate frosting could also work for a monochromatic, mysterious look.
More Spooktacular Halloween Treat Recipes
If you’re still in the mood for more Halloween fun in the kitchen, explore these other fantastic recipes that are sure to delight your ghastly guests:
- Jack-O-Lantern Cupcakes
- Spider Brownies Recipe
- Mummy Cake Pops
- Halloween Chocolate Covered Oreos Recipe
- Easy Halloween Spider Cookies
- 55 Delicious Halloween Cupcakes
We hope you enjoy making these magically simple and utterly charming Witch Hat Cookies as much as we do! They truly are a testament to how easy and fun Halloween baking (or rather, no-baking) can be. Perfect for parties, school events, or just a cozy night in, these treats will bring smiles and a sprinkle of spooky joy to everyone. Don’t forget to let us know how your creations turn out by leaving a comment or a star review below!
Pin
Witch Hat Cookies
Ingredients
- 24 Fudge Stripe Cookies
- 24 Chocolate Kisses Unwrapped
- 24 Pieces Candy Corn
- 4 oz Green Decorating Icing
Instructions
-
Place the fudge stripe cookies upside down so that the chocolate-coated side is facing up. This forms the base of your witch hat.
-
Using pre-made frosting at room temperature, pipe a circle around the center of the cookie, creating the hat’s brim.
-
Gently press an unwrapped chocolate kiss candy onto the middle of the icing. Allow the icing to seep out slightly from the sides to reinforce the hat brim appearance.
-
Carefully cut off the yellow portion of each candy corn and place it on the center of the icing brim, against the base of the chocolate kiss, to create the buckle detail.
-
Allow the cookies to set for a few minutes before serving. Enjoy your magical treats!
-
Pro Tip: Feel free to use any color icing or make your own! M&Ms or small red hot candies also make fantastic alternatives for the hat’s buckle.
Recipe Notes
Nutrition Facts
Pin This Now to Remember It Later
Pin Recipe
